search | FAQ |
profile | register | author help
|
|
|
| Author | Topic: Poppet Valve Servicing |
| Frank O |
 posted 07-01-2008 09:48 PM ET (US)
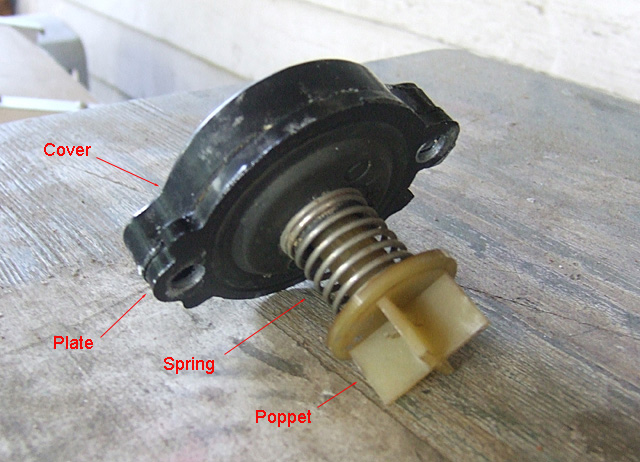
 My 1994 Mercury Offshore 3.0L 225HP carbureted 2-stroke outboard continues to overheat at higher rpm's. Since just about everything else in the cooling system has been recently serviced (new impeller, new thermostats), today I removed the poppet valve to service it:
http://www.inkbox.net/whaler/parts/poppet-valve.jpg I wanted to ask the following questions: 1) The cover is pretty well stuck to the plate. It looks as though there's a gasket between them that's probably fairly fused now. Is there a good way to separate components like this? I don't want to damage anything by banging on it with wild abandon. 2) What should I be looking for that would indicate whether the poppet valve is working properly or not? If I push the poppet down against the spring it depresses fairly easily, but it does not rotate. Is that normal? 3) My local Merc shop sold me gaskets as well as a plastic washer and diaphragm, saying these are the only parts they normally replace when they service poppet valves. Does that sound right, or should I be thinking about replacing more? I've read advice here to cut a loop off the spring so that the valve opens more easily, which I'll do once I can get it all apart. Thanks for any help. |
| outragesteve |
posted 07-01-2008 11:27 PM ET (US)
Frank O: I am in the process of the same issue on a pair of 225 EFI's. SOSMERC (Steve) suggested cutting the spring. I did this: I cut one whole "loop" off and guess what: It worked! SOSMERC is the man! In doing some more searching, I found a Merc Service Bulletin regarding the same issue. They have a different spring: Part #24-854478. Also, 120 degree thermostats, part # 14586. The bulletin also goes on to say there is a drain hole on the lower unit that needs to be restricted to help keep water in the exhaust/tower housing. This is part # 22-56800. Make sure the block off plate in the lower unit, just the water pump was not left off. If you lower unit has dual pick-ups there us a block off plate that restricts air from being sucked into the water pump. These plates replace the the original factory intake plates on the side of the lower unit. Part # is 832066-A1. The engines I'm working on have had this problem for many years and the owner sold the boat to my friend because of the overheating. I did everything to get the problem resolved, including new temp senders, gauges, water pumps, thermostats, etc, etc. One cut of the spring on the poppet valve and problem resolved. I am still going to replace the spring and thermostats to see how they work. Good luck, and thanks SOSMERC. The Service Bulletins are 96-19 and 96-20. Good luck... |
| outragesteve |
posted 07-01-2008 11:32 PM ET (US)
I forgot to answer your question: Use a flat putty knife to seperate the plate from the poppet valve cover. They usually open right up once your get them started. The gasket will be history but you are replacing it anyway. |
| Frank O |
posted 07-01-2008 11:55 PM ET (US)
Thanks, Steve, sounds like some interesting ideas to check out. I think in fact it was sosmerc who suggested cutting the loop off the spring. Two questions. First, if the poppet valve is functioning right, should the poppet rotate freely? Mine doesn't, though I can compress it against the spring. Second, when you talk about Service Bulletins, do you have somewhere you can get them online now? It seems as though Mercury has asked some websites to take down their collections of service bulletins. Thanks again. |
| outragesteve |
posted 07-02-2008 12:59 AM ET (US)
I would think you could push in the spring assembly and rotate it. I have never tried. I'd guess if it doesn't rotate it's because the flat plastic washer and diaphram are all corroded together. I found a great Merc Service Bulletin source just last week and it has been pulled. Does anybody know why? Please tell! I have a micro fiche set of bulletins but they are only through year 2000. Good luck... |
| Frank O |
posted 07-02-2008 07:17 PM ET (US)
Thanks, Steve -- the cover came off easily with a putty knife. Without being able to see the entire service bulletins it's hard to tell, but it appears as though the bulletins you mentioned which recommend the 120-degree thermostats and new poppet valve spring say they apply to 1997 engines. It leaves me wondering if these parts swap-outs are relevant to my 1994 225 -- or, if not, is there a potential downside to installing the new spring and 120-degree t-stats on my engine? I'm inclined for now just to try cutting a loop off my existing poppet valve spring. It would help if I had more of an experience base on how firm the spring is supposed to feel. Maybe watching the water pressure gauge closely while running might give me more data points on when the valve is opening. Mercury, incidentally, told me in an e-mail that service bulletins are (now?) available only to authorized dealers. They did send me excerpts from a service bulletin (regarding an electrical issue I'm also working, not the poppet valve), though it took me a couple of messages back and forth to receive all the information and a diagram I needed. |
| jimh |
posted 07-03-2008 09:11 AM ET (US)
Frank--Thanks for that excellent illustration of the poppet valve from a Mercury motor. My understanding of the poppet valve's function is to control the flow of cooling water in response to changes in the pressure. Your idea of removing a turn from the spring which applies pressure to the back of the valve would probably change the characteristics of the valve's response to applied water pressure so that it opens at a lower pressure. I make the inference that if the valve opens at a lower pressure, it probably will allow the flow of water to increase at a lower engine speed, since water pressure in the cooling system is usually proportional to engine speed. Increasing water flow at a lower engine speed should tend to lower the engine temperature. |
| sosmerc |
posted 07-03-2008 11:42 AM ET (US)
It is unfortunate that service bulletins are not easily available, but I've always been told by Merc representatives that the fear is the public will mis-use or mis-interpret the information. Even veteran technicians such as myself cannot easily obtain these bulletins...I have to "pry" the information out of my dealer contacts. In theory now, if you provide a Mercury franchised dealership with a serial number, they can use their Mercury network to display bulletins that pertain to "that" specific engine. Not all dealers are eager to help you out, so I suppose there are times when a phone call to Merc's customer service may be required...and even that is no guarantee that the person on the other end of the line is going to be able to effectively help you. Maybe now that times are getting tougher, Mercury will start to realize they need to "try harder" in order to keep customers loyal. (they are certainly not the only game in town anymore) |
| Frank O |
posted 07-03-2008 12:55 PM ET (US)
Sosmerc, here's a question for you. It appears that the last time the poppet valve was installed in my engine, a couple of parts were left out -- the grommet and the carrier. These are labeled 17 and 18 in the following diagram: http://www.inkbox.net/whaler/parts/poppet-valve-diagram.jpg I'm planning to put the poppet valve back together and install it on the engine this Saturday. If I put in a grommet and carrier when I install it, do you think that this alone could make it run cooler? Or should I go ahead and snip the spring anyway? |
| AZdave |
posted 07-03-2008 01:13 PM ET (US)
Check to make sure those two parts are not still in the block. I just changed poppet valves and thermostats on my V-6 Evinrude, and the parts seem remarkably similar. I think the grommet and carrier act as a seat for the valve. Good luck. Overheating at high RPM should be related to poppet valves rather than thermostats. Dave |
| gss036 |
posted 07-03-2008 01:47 PM ET (US)
Frank, if those two items are missing, then the poppet is not sealing at low speeds and probably not opening at higher speeds because you don't build up enough pressure to force the poppet open. That would cause overheating problems. |
| outragesteve |
posted 07-03-2008 03:07 PM ET (US)
Frank O: Those two parts must be installed. As gss036 points out, they are what keeps the pressure in the block. I big myth in outboard repair is removing the thermostats to make the engine run cooler. When this is done, this allows the water to flow faster through the block and not attenuate the heat away from the engine. This always can cause hot pockets on the heads and lead to detonation of a cylinder/piston. Good luck... |
| Frank O |
posted 07-03-2008 05:10 PM ET (US)
Thanks, guys. I'm not at the boat today, but when I was working on it a few days ago I took a picture of the opening on the block where the poppet valve mounts. I'm not seeing the carrier and grommet in there: http://www.inkbox.net/whaler/parts/poppet-block.jpg I'll check it more carefully just to be sure, though, when I'm back at the boat. I don't suppose these parts could work their way in and get lost inside the block? I did get over to a Merc dealer today and bought a new carrier and grommet. Not to be too clueless, but since I don't have the existing parts to work from, I have a couple of questions about how they're installed. 1) The grommet (which is relatively pliable) has a groove or channel on its outer circumference that appears to fit nicely over a lip in the inner circumference of the carrier (which is not pliable): http://www.inkbox.net/whaler/parts/poppet-carrier-grommet.jpg I gather that's how they're mated? 2) One face of the carrier has a beveled edge. You can see it in the shot above, or also in this photo taken edge-on: http://www.inkbox.net/whaler/parts/poppet-carrier-edge.jpg Which way does the beveled face go? Inward toward the engine block? Thanks again -- |
| outragesteve |
posted 07-03-2008 10:21 PM ET (US)
Frank: The manual does not show the bevel. I'm guessing it would face the poppet valve (the outside, away from the block) so that when you insert the plastic valve it won't "catch" the edge and dislodge the carrier from the grommet. Maybe sosmerc will confirm.....Good luck... |
| sosmerc |
posted 07-03-2008 10:28 PM ET (US)
Bevel goes in, towards the block. Be sure to use a center punch and punch in 4 different spots in the aluminum around the carrier...this helps to hold it in place...be sure the carrier is fully seated and not cocked. Before fully assembling the plastic carrier to the diaphram, I like to first insert it into the grommet and make sure that it is free to move in and out as well as rotate (even though it does not rotate when assembled). |
| Frank O |
posted 07-03-2008 11:47 PM ET (US)
Sosmerc: Thanks, that's a big help. Seems kind of odd to use a center punch on the metal throat to hold the carrier in place, but it's easy enough to try. |
| sosmerc |
posted 07-04-2008 11:36 AM ET (US)
You should be able to see where the factory "punched" in several places to secure the old carrier. |
| Frank O |
posted 07-12-2008 10:26 PM ET (US)
Update: Yesterday I took the parts for the poppet valve to the boat to reinstall them. On closer inspection, it turned out that the carrier and grommet were intact in the opening in the block where they're supposed to be. Today I had the chance to test the boat. Besides the work on the poppet valve, I had recently replaced the 19" Laser II propeller that came with the boat with a 15" Revolution 4, as it appeared it had been overpropped. I also recently installed a temperature gauge to supplement the temperature alarm so that we could watch trends in engine temperature. The ocean was flat enough today that we could run the engine through its paces at various speeds. On the propeller front, with the Rev 4 we can now reach ~5200 rpm at wide-open throttle, which is a significant improvement over the previous max rpm we obtained with the Laser II. Speed at WOT topped out around 40 mph, not quite as fast as with the previous prop. The engine seemed like it could run all day around 3000-3500 rpm with the temperature sitting at about 160 F. However, when we advanced the rpm much over 4000, eventually the temperature would begin to climb. I pulled back on the throttle, however, before it reached the point where the alarm would go. The water pressure results were odd. The pressure would be around 2 or 3 psi at idle, then climb to 5 psi at operating speed. It then sat at 5 psi at all engine speeds from 2000 to 5200 rpm. No great fluctuation (as we might expect to see if the poppet valve were opening) as we moved from one speed level to another. I'm now scratching my head over what it means if the engine overheats at high speeds and the water pressure sits at a consistent 5 psi through various speed ranges. The impeller and thermostats have been recently replaced, and we see a nice, strong stream of water from the telltale. |
| Clyde |
posted 07-13-2008 12:50 PM ET (US)
I suspect either the impeller or mating parts are not installed properly or are [ruined]. Or, the tube leading out of the pump up to the block did not line up correctly when the lower unit was reinstalled. Or there is a clogged water pickup screen. It sounds like you are not getting adequate flow. That seems likely to be because of the pump not having enough water to pump, the pump not pumping the water properly, or the water it pumps is not going past the pressure sensor. The pressure should be around 11-PSI at 4,000-RPM or higher. My 135 Optimax pressure gets up as high as 20-PSI at 5,500-RPM, but it spends a great deal of the RPM range at 11 to 14-PSI. The poppet valve, if installed correctly, will not fully open until around 11-PSI. Once it opens, the flow will increase signifigantly, and almost instantly you should see the temperature drop. |
| Frank O |
posted 07-17-2008 01:54 PM ET (US)
Thanks, Clyde. I've yet to do any work myself on the lower unit, except for resetting the trim tab (the impeller was replaced a few months ago by a Merc dealer who was doing annual maintenance for me). Do you think it's feasible with an engine the size of my 225 to take the lower unit off to look at the impeller when the boat is in the slip, or should I think about checking this out the next time the boat is on dry land? |
| outragesteve |
posted 07-17-2008 03:10 PM ET (US)
Frank O: I would certainly pull the boat out of the water and check the water pump assembly. We often spend hours chasing a problem only to go back to basics: If the water pump is not performing properly, the engine operating temperatures at all RPM levels may be wrong and alarms will sound. (Hopefully!) Get a manual and you can drop the lower unit in a few mintues: It is very straight forward. I would replace the complete water pump regardless of condition, so have one ready when you drop the lower unit. Good luck and keep us informed... |
| Frank O |
posted 07-17-2008 05:33 PM ET (US)
Steve, thanks, I'll take that as a vote for, "The lower unit is too big to try to work on while the boat is in a slip." I don't have anywhere to work on the boat out of the water -- it won't, for example, fit down my driveway, and my city says no-can-do on parking in front of the house -- so work gets divided between things I can do at the marina (always my preference) vs. jobs that require a trip to the Merc shop (logistically more complicated, and avoided whenever I can). |
Powered by: Ultimate Bulletin Board, Freeware Version 2000
Purchase our Licensed Version- which adds many more features!
© Infopop Corporation (formerly Madrona Park, Inc.), 1998 - 2000.