Page 1 of 1
1998 17 OUTRAGE II: Wire Path for Bow Trolling
Posted: Fri Jan 22, 2021 1:02 am
by azegarra43
Give me recommendations on routing the [bow] trolling motor wiring to the console on a 1998 17 OUTRAGE II.
I don’t have much to work with and want to try to get the [power outlet connector] as close as possible to the trolling motor.
Re: 1998 17 OUTRAGE II: Wire Path for Bow Trolling
Posted: Fri Jan 22, 2021 10:49 am
by Phil T
It is not possible to run wiring in the hull or via the rub rail.
When installing a bow mounted on a boat that is not "pre-wired", one method used is the "extension cord" method.
The highly recommended approach is to install batteries in the console, wired to a receptacle [socket] installed on the outside console wall. The short pigtail wire from the motor will need a female plug installed. A heavy duty "extension cord" of the proper gauge wire is fabricated with male connectors on both ends.
When deployed, the extension cord is connected to the console outlet and the motor. When not in use it is stowed in the console.
You can also add a hinged section to the rail. Search "bow rail hinge" and you will see the DIY steps.
Re: 1998 17 OUTRAGE II: Wire Path for Bow Trolling
Posted: Fri Jan 22, 2021 2:29 pm
by jimh
If can't say that routing a large cable between the console and the bow compartment below the deck on a 1998 17 OUTRAGE II will be impossible, but I am reasonably confident it will not be very simple or very easy.
The method suggested by PHIL T above is a very workable approach. The only advice I would offer is to be certain to choose proper connectors. The connector on which the power source is available must have female gender contacts. There should never be an instance in which the source of power can be left exposed on male gender contacts. All connections and connectors must be very resistant to entry of water. I have not attempted to engineer or design a power system for high-current low-voltage power with an extension cord, so I do not have any handy products to recommend.
Regarding hiding the cable below the cockpit deck, this might be possible but would require very crafty work. A hole saw of about 1-inch OD would be used to drill through the underlying foam below the deck level. Exactly how this could be accomplished is unknown to me because I am not familiar with the construction and details of the 1998 17 OUTRAGE II. The drilling would likely have to be done in many increments, with an extension added to the hole saw to extend its reach. The alignment of the hole being drilled would also have to be very carefully maintained, both vertically and horizontally. Exactly where the hole would begin and end would have to be determined. Once the hole was successfully drilled, a flexible conduit could be pulled in place, then the electrical conductors pulled into the conduit. Again, accomplishing this won't be simple or easy.
When Boston Whaler provides an under-deck conduit between the console and the bow, I am sure that the conduit is put in place into the hull liner part before the hull and hull-liner parts are joined and the space between them filled with foam.
Re: 1998 17 OUTRAGE II: Wire Path for Bow Trolling
Posted: Sat Jan 23, 2021 12:49 pm
by jimh
There may be some de facto standard connector for trolling motors. I don't have any experience.
One possible connector that I have experience with is the SpeakON connector. They are available in four pole designs. If the motor is a 12-Volt DC motor you could use a four conductor cable with two conductors each for positive and negative. A four-conductor cable with 14-AWG conductors in a rubber jacket is generally available, and perhaps even 12-AWG conductors might be workable. Two 12-AWG conductors ought to be about the same as a single 10-AWG.
More about SpeakON connectors from Neutrix at
https://www.neutrik.com/en/product/nl4fcI don't think the SpeakON is rated for a particular resistance to water. Note this connector is widely imitated by Chinese knock-off connectors.
Another idea would be to make the power cord a permanently wired part of the console. This eliminates two connectors. The power cord would be coiled and stowed in the console when not in use--just as the extension cord would be. With a permanently-wired power cord originating from inside the console, you would just need one pair of connectors at the trolling motor. Stowing the permanent power cord in the console removes its connector from the weather.
Re: 1998 17 OUTRAGE II: Wire Path for Bow Trolling
Posted: Sun Jan 24, 2021 9:45 am
by Jefecinco
I would route the power cable as directly as possible. Generally shorter is better. I have seen products used to route cables across traffic routes or walkways that both hide and protect the cable and lower the trip hazard presented by naked cable laying on a floor. It is often made of a resilient material for comfort when stepping on it. It can be attached to the floor, or deck on a boat, by double backed tape or adhesive. If using such a product I would not use a product to secure it to the deck that could not be removed without damaging gel coat.
Some advantages to using the product is that it would not need to be removed when the trolling motor is not in use, it is not overly unattractive, is easily installed and is low cost. The major disadvantage is that a modest tripping hazard will be on your deck. That hazard could be mitigated by using a product with a noticeable color such as yellow.
Re: 1998 17 OUTRAGE II: Wire Path for Bow Trolling
Posted: Mon Jan 25, 2021 10:39 am
by jimh
Jefecinco wrote:I have seen products used to route cables across traffic routes or walkway...
See a heavy-duty cable trough for floor use at:
https://www.cabletiesandmore.com/heavy-duty-rubber-cable-protectors?The advantage of the above type of floor cable trough is the cable can be easily installed or removed as needed.
There are lower-profile floor cable protectors made from more flexible vinyl materials, but generally inserting the cable into those devices takes more time. Once the cable is in the floor protector, it won't be as easy to remove. If you coil the floor protector when not in use, the vinyl may take a set and then not lie flat on the deck when uncoiled.
I think you could make your own floor cable protector from a wood plank. Bevel the outer topside edges, and cut slots on the underside for the cable. Paint the wood to match the deck color. Hold the plank in place with small cleats at each end. The height (thickness) of the plank would need to be just high enough to cover the cables, so perhaps about 1-inch thick lumber.
Re: 1998 17 OUTRAGE II: Wire Path for Bow Trolling
Posted: Mon Feb 08, 2021 10:11 pm
by azegarra43
Continuous Wave Family,
Here is my update on my 36-Volt Minn-Kota TERRANOVA saltwater trolling motor installation on my 1998 17 Outrage II.
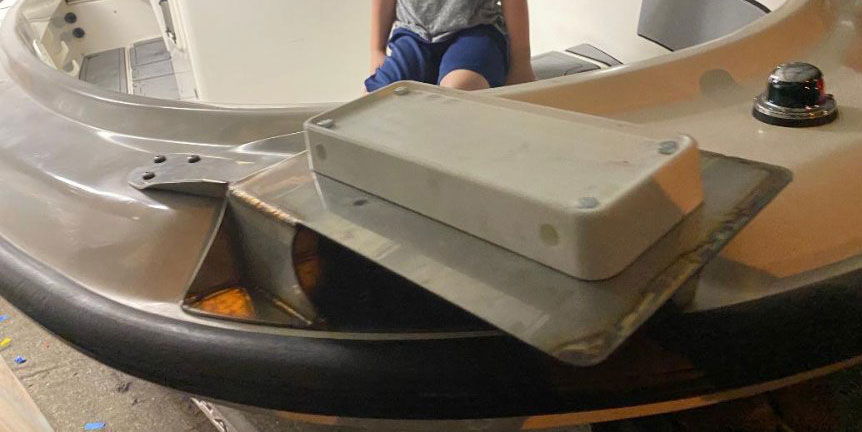
- Fig. 1. I removed the starboard bow cleat. A friend fabricated a 316 stainless steel bracket , which attaches to the embedded phenolic reinforcement material using the same four bolt pattern as the cleat fasteners used. The mount also attaches to the closest bow rail base three-screw mounting points.
- TM-mount_.jpg (55.21 KiB) Viewed 4039 times
Note I had to remove the OEM bow railing, and I am now in the process of fabricating a new bow railing.
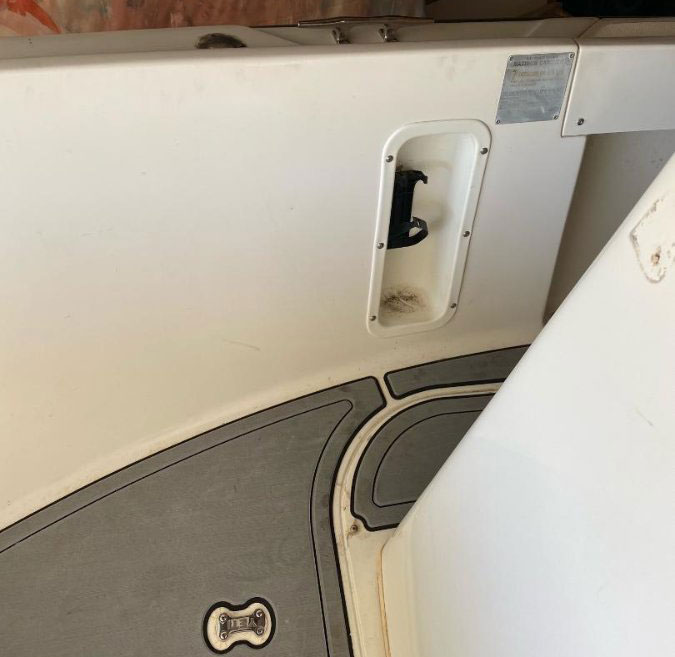
- Fig. 2. For the wiring I ran AWG-6 wire under the console into the space behind the fire extinguisher mount. I then used a 54-inch-long flexible 3/4-inch drill bit designed to run wire in homes to drill as far toward the bow as possible to where the trolling motor is mounted.
- TM_WirePath.jpg (45.59 KiB) Viewed 4028 times
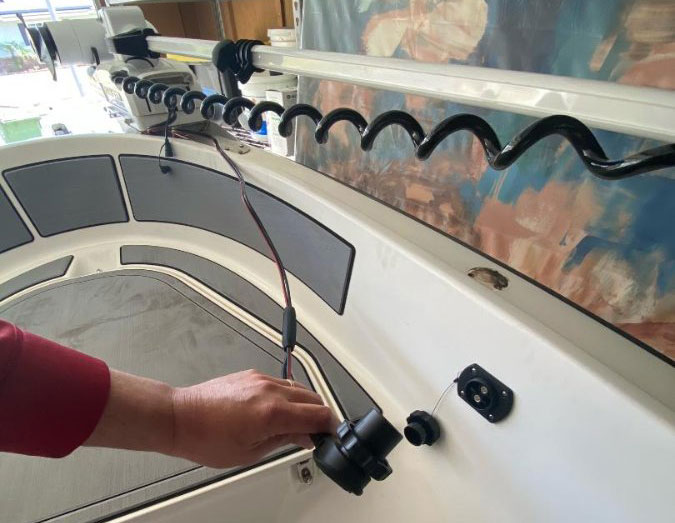
- Fig. 3. I used the Minn Kota plug and cut the proper size hole to meet the drill bit and was able to pull the wire and solder it together. I used AWG-6 wire because of the length of the conductors.
- TM-wiring-2_.jpg (67.19 KiB) Viewed 4032 times
Everything is very secure and all wiring is soldered and shrink wrapped. If I ever decide to remove the trolling motor I can replace all original equipment (cleat and bow rail) as all original mounting points are still unaltered.
Re: 1998 17 OUTRAGE II: Wire Path for Bow Trolling
Posted: Tue Feb 09, 2021 9:56 am
by jimh
Good solution. Thanks for the update.
How did you control the direction of the 54-inch flexible drill when drilling holes into the interior foam of the Unibond hull between the fire extinguisher molded insert and the bow area where the trolling motor was located?