When I acquired my 1976 Mercury 500 (50 HP) outboard, its previous owners had mounted and removed something from the anti-ventilation plate, leaving behind four rather large 3/8-inch diameter holes. In addition, there was the usual paint missing from the tip of the skeg, the result of abrasion with sandy bottoms over the years. I decided to fill in the holes and repaint the lower unit.
![[Image: Three products used in repair]](graphics/threeCansTrans.gif)
Three specialty products are needed to make this repair: epoxy to fill the holes, special primer paint, and OEM matching topcoat paint. The total cost for these will typically be under $30.
Epoxy thickened with some filler materials make the perfect goop for filling holes like these. Epoxy is strong, it adheres well, and you can get it formulated for the marine environment. I like West System Epoxy. You can buy it in small repair kits. You might find something that works as well and is cheaper, but in the quantities needed to fill a few holes, the difference in price is probably about a dollar.
The epoxy repair phase will take a day, most of it spent waiting for the epoxy to set. First, remove any dirt and grease from the area of the holes. Sand the area around the holes until you're down to clean metal. Wipe the area clean with alcohol. Don't use acetone; it may soften the existing paint. On the underside of the anti-ventilation plate, cover the bottom of the holes with masking tape, but bulge the tape downward to allow the epoxy to fill below the plate slightly. On the topside of the plate, mask off an area around the hole, leaving about an eight of an inch surrounding the hole. Mix the epoxy according to the directions, adding some fairing compound to thicken it slightly to the consistency of catsup. Fill the holes with epoxy, avoiding air bubbles.
|
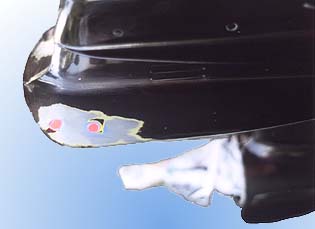
Holes filled with epoxy and sanded smooth, ready for primer coat. The epoxy has been thickened with a low density filler/fairing compound, giving it a reddish color. The propellor has been removed and the prop shaft protected. |
Now, wait 24 hours for the epoxy to set. The next day you can tear off the masking tape and sand the epoxy smooth. If the holes were completely filled you will be able to sand them smooth to the metal surface. Next, you're ready for paint.
Most outboard lower units are cast from aluminum. Exposing bare aluminum to water, even fresh water, invites corrosion. You can protect the sizeable financial investment in your ourboard with just a few cents of primer paint.
When you sanded and removed the topcoat color, you likely found a greenish undercoat/primer. That was probably zinc-chromate primer paint. You will find it difficult to buy zinc-chromate primer these days. The government has stepped in to protect you and the environment. Instead, you will find zinc-phosphate. This probably doesn't work as well, but there must be some environmental concern about the "chromate" part of the other formulation. It is probably a heavy metal and toxic. I used TEMPO brand Zinc-Phosphate primer, available at most marine stores. It is recommended as a primer and corrosion protection for aluminum outboard and outdrive lower units.
Another primer alternative is available from automotive stores, called "self-etching primer". This is a similar color green. I don't know what the chemistry is, but this primer is able to etch itself into bare metal finishes, making an excellent undercoat and primer. Be careful if you use it. The overspray will also etch itself into gelcoat quite nicely as well.
Mask off the area to be repainted, chosing lines for the tape that blend with natural lines on the lower unit. This will help disguise the transition between your touch-up paint job and the factory original. Use plenty of newspapers to cover the transom; airborn paint has a tendency to settle at long distances from where you spray it.
The secret to painting is patience. Don't try to cover the area in one coat. Spray on several light coats, perhaps six or more, to build up a drip free primer coat that completely covers the old surface. Follow the directions on the paint can, especially those about shaking and mixing the paint before and during use.
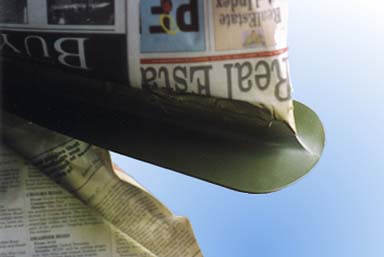 |
Zinc Phosphate primer provides good corrosion protection. If you look carefully you can just see the old holes due to a slight change in texture in the surface. |
You don't have to allow each coat to dry completely. You can recoat the primer as soon as the previous coat become tacky. If you spray light coats, you can recoat in ten minutes. After about an hour of this, you should have the primer coat done. It should completely cover all the old paint, epoxy and metal areas, and it should have a uniform appearance. This is when you find out how well your epoxy filling and sanding really worked. Any little imperfection in the surface will now be very visible. Now wait 24 hours for the primer to dry.
If you can get the OEM matching color, you might as well spend the extra buck or two and get it. My engine is painted black, so you'd think that black is black; why worry about matching. My local Mercury Marine dealer had a large spray can of Phantom Blackfor $6.80. Again, why save a dollar and get something that does not match.
With a good primer base, the topcoat should go on and cover easily.
Be sure to read the instructions on the can before use.
The brand I used (Mercury Phantom Black enamel) had some interesting comments about
recoating. They warned:
Recoat within first four hours or after one week.
Any attempt to recoat between these intervals may result in lifting of the
first application.
Apply as many coats of the topcoat as it takes to cover the primer. This will depend on your topcoat color. In my case, black, one or two light coats will cover. Once you have built up the topcoat layers, wait at least 24 hours for them to dry.
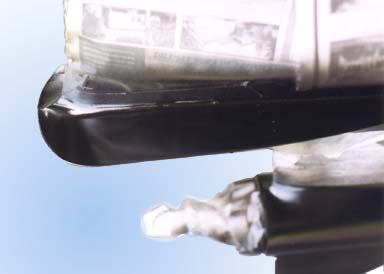 |
The OEM topcoat color has been applied. The color match is excellent. The four holes in the anti-ventilation plate have disappeared! |
There you have it: three days of work and your outboard lower unit looks like new. Now go out on the lake and look for that shallow spot...
Copyright © 1999 by James W. Hebert.
This is a verified HTML 4.0 document served to you from continuousWave
URI: http://continuouswave.com
Last modified: July 16, 2022
Author: James W. Hebert