Hi everybody. I'm back! with a new restoration.
Our current project, a 1981 17' striper was bought a couple of months ago from one of our clients.
She is planning on buying a bigger boat for her resort, and she wanted us to be the first ones to consider buying the boat.
Well..., we did and we're excited to share the restoration with you all.
Sit back, enjoy the ride, and welcome to 'So my dad and I bought a boat 2'
So my dad and I bought a boat 2 : 1981 striper 17' restoration
Re: So my dad and I bought a boat 2 : 1981 striper 17' restoration
The day the boat came, we could already tell it was in a bit of a rough shape.
We stripped the railings and fixed the engine up as well.
All the e-tec needed was a new fuel pump and it fired right up.
We stripped the railings and fixed the engine up as well.
All the e-tec needed was a new fuel pump and it fired right up.
- Nota bene: original images have been cropped --jimh]
- three.jpg (62.29 KiB) Viewed 13116 times
Re: So my dad and I bought a boat 2 : 1981 striper 17' restoration
The whole point to restoring this boat has been to come up with something unique.
Our clients loved our first restoration, so we wanted to use that as a base.
I started doing some google searching, till I came about the 40th anniversary whaler 13
My dad and I both love that model so we thought, heck let's make its bigger sister.
[Nota bene: I have replaced a rather strange copy of this image with the original, which I created and is found in the REFERENCE section of the website.--jimh]
Re: So my dad and I bought a boat 2 : 1981 striper 17' restoration
- [Nota bene: original image has been cropped --jimh]
- theGuy.jpg (18.6 KiB) Viewed 13117 times
Re: So my dad and I bought a boat 2 : 1981 striper 17' restoration
- Man with bare feet in boat with hose
- man'sFeet.jpg (17.98 KiB) Viewed 13019 times
- Open paint containers
- openPaintContainers_a.jpg (16.64 KiB) Viewed 13009 times
- Outdoor work shed
- workshed.jpg (34.96 KiB) Viewed 13017 times
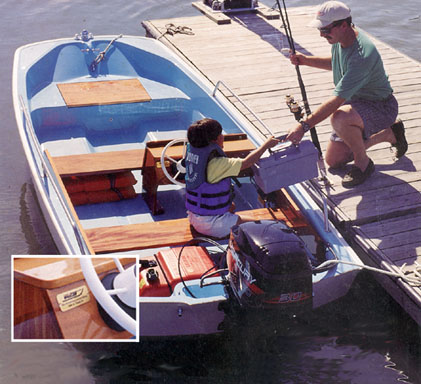
We've been going at it like clockwork. Our progress has been twice as fast compared to our previous restoration. The boat's interior has been painted and we're planning on tackling the floor today. There is one minor soft spot upfront and the old old foam should be scooped out today.
Re: So my dad and I bought a boat 2 : 1981 striper 17' restoration
- Camera at transom
- WhatsApp Image 2018-04-25 at 10.18.10 AM(3).jpeg (173.96 KiB) Viewed 13155 times
All our hard work is paying off.
My dad is loving the result and so is our mechanic.
Pictures taken yesterday.
- Camera at gunwale level
- gunwaleView.jpg (26.28 KiB) Viewed 13010 times
Re: So my dad and I bought a boat 2 : 1981 striper 17' restoration
We've finally come to the part where my helpers and I dig out and replace the old foam. We started out checking how far the soft spot of fiberglass was spread, cut this out using a grinder, and we started digging out the old wet foam.
Thankfully the general area of soft fiberglass wasn't all that big and we ended up cutting a trapezoidal piece of about 10-inches wide at the top, 21-inches wide at the bottom, and 15.5-inches in length from top to bottom.
To make sure we did not miss any wet foam or rotten wood, we kept digging until we spotted dry foam and wood, and we then cut out an extra 2-inches of wood on each side.
For the foam to expand and stay inside its compartment, we cut two 10-inch pieces of marine plywood and held them down with stainless steel screws. These would help us later, screwing in a new floor piece (lid) to keep to foam inside.
- Discarded foam
- P2a.jpg (19.95 KiB) Viewed 13024 times
- Wet foam removed
- P1.jpg (56.18 KiB) Viewed 13040 times
- Trapezoidal cut out
- P0a.jpg (25.85 KiB) Viewed 13023 times
Re: So my dad and I bought a boat 2 : 1981 striper 17' restoration
The following shows us filling the compartment with foam.
We used 2-lbs two-part polyurethane foam from SeaHawk. We used [less than] than a cup of our half-and-half mixture.
It took about two minutes for the foam to expand and dry. We closed off everything with 1.5-ounce chop-mat fiberglass soaked in a polyester resin mixture.
We used 2-lbs two-part polyurethane foam from SeaHawk. We used [less than] than a cup of our half-and-half mixture.
It took about two minutes for the foam to expand and dry. We closed off everything with 1.5-ounce chop-mat fiberglass soaked in a polyester resin mixture.
- P3.jpg (40.19 KiB) Viewed 13038 times
- P5.jpg (60.94 KiB) Viewed 13038 times
- Mixing cups used to measure two-part foam
- P4a.jpg (17.32 KiB) Viewed 13013 times
Last edited by BWbert on Sun May 06, 2018 10:06 am, edited 1 time in total.
Re: So my dad and I bought a boat 2 : 1981 striper 17' restoration
- P6a.jpg (25.67 KiB) Viewed 13012 times
- P7a.jpg (32.06 KiB) Viewed 13006 times
Re: So my dad and I bought a boat 2 : 1981 striper 17' restoration
BERT--after you made a trapezoidal cut-out into the original deck, removed wet foam, introduced new foam, and used a piece of plywood to contain the foam as it expanded, did you leave the plywood in place to become the underlayment for the deck?
Are you going to re-use the cut-out section of the original deck atop the plywood?
Are you going to re-use the cut-out section of the original deck atop the plywood?
Re: So my dad and I bought a boat 2 : 1981 striper 17' restoration
BERT--when you removed foam from the interior of the hull in the area under the trapezoidal deck cut out, did you establish a nice, clean, straight-line edge for the boundary of the old foam to the new foam?
Re: So my dad and I bought a boat 2 : 1981 striper 17' restoration
We did leave the cut-out as underlayment for the deck.
We did our best for the new foam to allign with the old foam.
We did our best for the new foam to allign with the old foam.
Re: So my dad and I bought a boat 2 : 1981 striper 17' restoration
BERT--you also mention removing some wood from the hull interior. Can you describe in more detail where the wood was located? Was it part of the deck underlayment to reinforce the deck?
Re: So my dad and I bought a boat 2 : 1981 striper 17' restoration
jimh wrote:BERT--you also mention removing some wood from the hull interior. Can you describe in more detail where the wood was located? Was it part of the deck underlayment to reinforce the deck?
Yes [the removed wood] was the deck underlayment. Where we cut open and dug out the foam, we also removed and replaced the wood.
Re: So my dad and I bought a boat 2 : 1981 striper 17' restoration
BERT--thanks for the further details. I know it is hard to accomplish work and take pictures at the same time, particularly when the work involves getting your hands dirty. You are doing a nice job of documenting this work.
Re: So my dad and I bought a boat 2 : 1981 striper 17' restoration
jimh wrote:BERT--thanks for the further details. I know it is hard to accomplish work and take pictures at the same time, particularly when the work involves getting your hands dirty. You are doing a nice job of documenting this work.
No problem. I'll do anything to make it better :)
Re: So my dad and I bought a boat 2 : 1981 striper 17' restoration
Before I continue telling the story of our progress,
The same day we repaired our boat's floor, we also applied our anti slip.
We primarily decided on the interlux anti slip of which pictures of its result will follow.
Not that its a bad brand, but the result did not give an aggressive enough grip.
How the anti slip was applied was by mixing it together with paint, and rolling the mixed batch unto its desired locations.
We could have used more but that would be a waste of a rather expensive product.
After further conversations with some of my boatbuilder friends,
they explained to me that interlux is used more after applying aggressive anti slip.
It's a way to make the anti slip's texture spread out evenly across where it is applied.
- Attachments
-
- P8.jpg (43.81 KiB) Viewed 12920 times
-
- P10.jpg (26.2 KiB) Viewed 12920 times
-
- P11.jpg (31.71 KiB) Viewed 12920 times
Re: Now back to our regularly scheduled program
We've had a bit of a rough week due to sudden heavy rains.
The paint that was already applied did hold, but we decided to wait out the bad weather and choose a date to re-apply paint.
While this was going on, we did find time to apply the new anti-fouling.
What we used was Total Boat's copper-free anti-fouling that is said to be more resilient against drag.
We have had good experience with the paint on our own boat, even gaining a minimum of 3mph,
and since our 17 striper already had anti-fouling, we found it would fit to apply a fresh coat of bottom paint.
- Attachments
-
- bottom3.jpeg (109.25 KiB) Viewed 12916 times
-
- bottom2.jpeg (100.16 KiB) Viewed 12916 times
Re: So my dad and I bought a boat 2 : 1981 striper 17' restoration
Weather finally cleared up. We lightly sanded down the original coat of paint using a light grid sanding sponge.
- Attachments
-
- interior1.jpeg (88.61 KiB) Viewed 12916 times
Last edited by BWbert on Thu May 10, 2018 11:39 pm, edited 1 time in total.
Re: So my dad and I bought a boat 2 : 1981 striper 17' restoration
Final coat of paint has been applied and we're satisfied to say the least.
We're letting everything dry up right now for us to inspect it later.
After this we'll re-apply a thicker anti-slip, and afterwards we'll continue with interior detailing like the console and casting deck.
We're letting everything dry up right now for us to inspect it later.
After this we'll re-apply a thicker anti-slip, and afterwards we'll continue with interior detailing like the console and casting deck.
- Attachments
-
- interior2.jpeg (65.61 KiB) Viewed 12916 times
-
- interior3.jpeg (50.52 KiB) Viewed 12916 times
-
- interior4.jpeg (76.66 KiB) Viewed 12916 times