I have now just removed the wood interior on my 1987 SUPER SPORT 15. The wood was in rough shape so I’ve been sanding. I am going to [refinish the wood with] varnish. If this job weren't tedious enough, I’m dreading re-installingl the refurbished wood interior onto the boat.
I’m looking for advice on the best way to reinstall the wood interior once [the sanding and varnishing is] done. All of the hardware has already been removed, has been put in ZipLoc bags, and the bags labelled.
I’d like to use new stainless steel hardware when reinstalling. However, that means matching up new hardware with the old.
HINT: if someone gave me a list of all the hardware needed for a 1987 SUPER SPORT 15 interior installation [then buying new hardware} would be easier.
QUESTIONS ABOUT HARDWARE SOURCES
Q1: what is the best method to replace all the existing hardware needed for re-installing the wooden interior on a 1987 SUPER SPORT 15 with new stainless steel hardware?
Q2: can I just go to a hardware store [with the original hardware and buy new replacement stainless steel hardware by] matching up piece by piece?
QUESTIONS ABOUT BEST PRACTICES
Q3: what is the best method for creating new screw holes when screwing wooden pieces together?
Q4: should nylon washers be used where there are through=bolts?
Q5: for structural integrity should all the seat clamp holes on the side of the boat be filled with epoxy before putting new hardware on?
Q6: should silicon caulk be used prior to mounting pieces back to the boat?
ASIDE
I am new [to working with wood and fastening hardware].
1987 SUPER SPORT 15 Interior Refurbishment
Re: 1987 SUPER SPORT 15 Interior Refurbishment
I would not purchase any 'hardware' from a hardware store if you can avoid it. Either a marine specialty store or a trusted online vendor. i have purchased a lot of hardware in the past from McMaster Carr, an advantage with that company is a very wide selection and you can choose the grade of fastener you want.Maboter wrote:Q2: can I just go to a hardware store [with the original hardware and buy new replacement stainless steel hardware by] matching up piece by piece?
[The best method to create a new screw hole] In wood [is to use] the appropriate pilot hole size for non-tapered machine screws and [to use] a tapered bit for tapered wood screws.Maboter wrote:Q3: what is the best method for creating new screw holes when screwing wooden pieces together?
In fiberglass I always dill a pilot hole and will test the screw to be used to make sure I have the right size pilot. Different thickness of fiberglass can dictate slightly different pilot hole diameters. I always chamfer the hole with a chamfering bit, this helps prevent gelcoat cracking or spidering.
I always run new unused screws in the pilot holes to cut the threads. Screws used for cutting the threads are not reused for the item attachment, they are discarded.
[The use of nylon washers] depends on the application. If you are attaching items to aluminum with stainless screws a best practice is to isolate the screw from the aluminum with nylon washers or nylon inserts.Maboter wrote:Q4: should nylon washers be used where there are through-bolts?
Silicone should never be used. I would suggest a polyurethane or polysulfide caulk.Maboter wrote:Q6: should silicon caulk be used prior to mounting pieces back to the boat?
Thanks,
Duane
2016 World Cat 230DC
1999 Outrage 21, Yamaha SW Series II 200
1997 Outrage 18, Yamaha 125
1983 15 SS, Honda 50
1980 42 Post
1983 34 Luhrs 340 SF
Duane
2016 World Cat 230DC
1999 Outrage 21, Yamaha SW Series II 200
1997 Outrage 18, Yamaha 125
1983 15 SS, Honda 50
1980 42 Post
1983 34 Luhrs 340 SF
Re: 1987 SUPER SPORT 15 Interior Refurbishment
[To PORTHOLE] Thanks for the reply. Your advice is very helpful.
Specialty Marine graciously helped me out with their hardware list for re-installing the wood interior on a SUPER SPORT 15. (See below.) I have not yet acquired these items, so I can't match them up to what was on the boat previously. However, I can see the list Specialty Marine gave uses all screws. On the interior of my Super Sport, many of the pieces were connected by through-bolts.
Super Sport 15 Hardware List for Wood Interior
from SPECIALTY MARINE:
Q7: should I maintain the through-bolts where they were?
Q8: should I use the fasteners on the Specialty Marine list?
The Specialty Marine might be different because they are using a new set of wood interior.
Q9: when screwing the wood interior together, would you drill new holes right next to the old holes?
Q10: when screwing the wood interior together, would you use the same ones?
For instance, on the hinge that attaches to the seat and the back rest, I could move the hinge slightly over and utilize new screw holes instead of trying to use the old ones.
Thanks again.
[Moderator's note: there is nothing in the forum software that prohibits the posting of pictures. If you need help with posting pictures, please visit the forum
INTRODUCTION TO THE FORUM SOFTWARE
and read the article whose topic is
ADDING IMAGE TO POST
If you need help finding the forum, the URL is
https://continuouswave.com/forum/viewforum.php?f=1
If you need help finding the article the URL is
https://continuouswave.com/forum/viewto ... f=1&t=2569
Please do not use a boating forum to begin discussion about how to use for forum software--Moderator]
Specialty Marine graciously helped me out with their hardware list for re-installing the wood interior on a SUPER SPORT 15. (See below.) I have not yet acquired these items, so I can't match them up to what was on the boat previously. However, I can see the list Specialty Marine gave uses all screws. On the interior of my Super Sport, many of the pieces were connected by through-bolts.
Super Sport 15 Hardware List for Wood Interior
from SPECIALTY MARINE:
- (27) 12X1.5 phil oval
(3) 14X2 phil oval
(30) finishing WASHERS
(3) BUTT HINGES
(12) 6 x 1/2 Phil Flat A SMS 18-8 (HINGE SCREWS)
(12) #6 x 1/2" phil PAN
Q7: should I maintain the through-bolts where they were?
Q8: should I use the fasteners on the Specialty Marine list?
The Specialty Marine might be different because they are using a new set of wood interior.
Q9: when screwing the wood interior together, would you drill new holes right next to the old holes?
Q10: when screwing the wood interior together, would you use the same ones?
For instance, on the hinge that attaches to the seat and the back rest, I could move the hinge slightly over and utilize new screw holes instead of trying to use the old ones.
Thanks again.
[Moderator's note: there is nothing in the forum software that prohibits the posting of pictures. If you need help with posting pictures, please visit the forum
INTRODUCTION TO THE FORUM SOFTWARE
and read the article whose topic is
ADDING IMAGE TO POST
If you need help finding the forum, the URL is
https://continuouswave.com/forum/viewforum.php?f=1
If you need help finding the article the URL is
https://continuouswave.com/forum/viewto ... f=1&t=2569
Please do not use a boating forum to begin discussion about how to use for forum software--Moderator]
Re: 1987 SUPER SPORT 15 Interior Refurbishment
To prepare a fastener hole for re-use with epoxy resin, the epoxy resin should be mixed with a filler material. Trying to cut threads into cured epoxy resin without filler material could lead to cracking of the laminate.Maboter wrote:Q5: for structural integrity should all the seat clamp holes on the side of the boat be filled with epoxy before putting new hardware on?
Also, if the fastener hole is in an areas where there is embedded wood below the thin laminate layer, insertion of a wood plug into the hole is often used. The wood plug can be glued in place with a wood glue if desired, or epoxy adhesive.
The best approach to creating a wood plug is to use a plug cutter bit, and to cut the plug from wood similar to the embedded wood, which is likely marine plywood. The wood plug should be inserted into a suitable pre-drilled hole, and installed below surface level. The resulting depression is then filled with tined gel coat resin. If the filled hole will not actually be visible because it will be covered by that ever is going to be fastened to it, then you can use epoxy resin mixed with a white filler to fill the depression and not obsess about a perfect color match.
When fairing a hole that has been filled with epoxy resin to be flush with the surround gel coat layer, be careful when sanding that you do not inadvertently remove more of the surrounding gel coat layer than you do the cured epoxy material. Well-cured epoxy can be harder than old gel coat resin, and the older gel coat resin will be more rapidly removed by sanding than will the epoxy.
Re: 1987 SUPER SPORT 15 Interior Refurbishment
When you are planning to disassemble any structure or assembly that has many components that are fastened together with threaded fasteners and use retaining nuts and perhaps flat washers or lock washers or use decorative ring washers or use cap nuts or other unusual combinations of hardware, a very good METHOD to aid the reassembly of the structure or the assembly will be, as you remove each individual fastener, or flat washer, or nut, or decorative trim, or lock washer, or cap nut, associated with a particular area or segment of part or location or detail of the structure or assembly to place those particular fasteners or washers or nuts or decorative trim pieces into a separate container, such as a clear plastic bag that can be easily sealed and sold under the trade name of ZIP-LOK bag or some similar generic bag of that type, or to purchase a plastic organizing container that has many individual bins of various sizes and to group all the fasteners and washers associated with a particular area or section in one bin and then to insert a small slip of white paper on which you write a label using a black ink pen that describes the area or part of component from where those fasteners.Maboter wrote:Q1: what is the best method to replace all the existing hardware...on a 1987 SUPER SPORT 15...?
Having organized all the various fasteners and nuts and washers and other devices associated with a particular area or section of the assembly into groupings and stored them in marked containers, you should, upon attempting to reassembly the structure or assembly after some period of time has elapsed during which your recall of the exact purpose of each fastener or washer or nut has been lost, then be able to associate each group of fasteners and washers and nuts and so on with a particular purpose.
You could also take photographs of each particular area as you disassemble the structure or assembly, and give those photographs an identification such as a file name or if the photographs are actual printed photographs you could write on the back surface of the photograph an identification, and then use that same identification to label the bag or bin or container in which those items have been segregated and organized for storage.
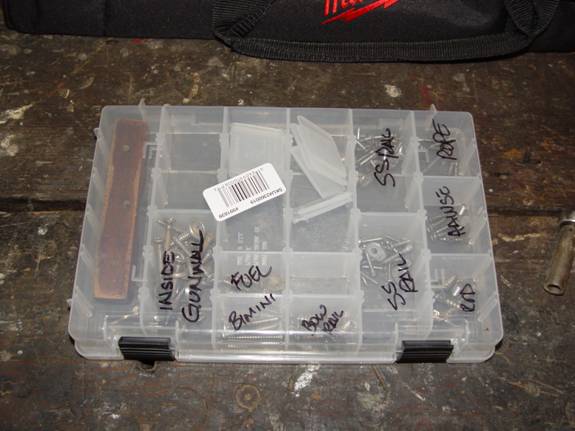
Fig. 1. A plastic container with individual bins which has been used to store fasteners and other hardware in an organized manner to permit re-use when they will be re-installed.
I think you may have already used this method--except perhaps not the use of photographs--so you should now be completely ready to proceed with the project.