NMEA-2000 Network Power

Electrical and electronic topics for small boats
jimh
Posts: 11725
Joined: Fri Oct 09, 2015 12:25 pm
Location: Michigan, Lower Peninsula
Contact:

NMEA-2000 Network Power

Postby jimh » Wed May 25, 2016 1:52 pm

This article reprises some comments I have previously made about arrangements for NMEA-2000 network power. I describe the installation in my own boat in some detail. My approach to network powering is quite complicated, and probably not necessary for most installations, so don't think it always must be this crazy.

My boat's NMEA-2000 network is a small network. It has only four devices connected to it (at present):

--Lowrance HDS chart plotter

--ICON Pro RPM gauge

--Lowrance EP-85R data storage module

--ICON Gateway from E-TEC engine

The network power is provided from two sources:

--a dedicated network power node T-connector

--the ICON gateway module

In NMEA-2000 network practice, the recommended method for powering the network is to have a dedicated network power node T-Connector, but several manufacturers have produced devices which also power the network they attach to. In my boat's network, there is a device that wants to power the network: the Evinrude ICON Gateway module. I believe Evinrude took this approach in order to simplify the installation of their own brand of instrumentation, which uses NMEA-2000 networking.

Since it is not recommended to have two sources of power connected in common via the network, I have split my NMEA-2000 network into two segments which isolate the power. One segment is powered by a dedicated network power node T-Connector, and the other segment is powered by the ICON gateway module. Here is an diagram of my NMEA-2000 network and its power arrangements:

TERM-<-T-<<-T-<<-T-(power block)-<<-T-<<--T--<-TERM
| | | | |
| | | | |
| | ICON Gauges HDS-8 Power
| | from
| EP85R Relay
|
ICON Gateway
from E-TEC
Engine


Note that in the drawing I show the male (pins) connectors of the backbone network T-connectors pointing toward the power insertion device. This means that if the network is expanded, the connector on the T-connector that will be powered will be a female connector. This avoids exposing the power circuit on open pins of a connector.

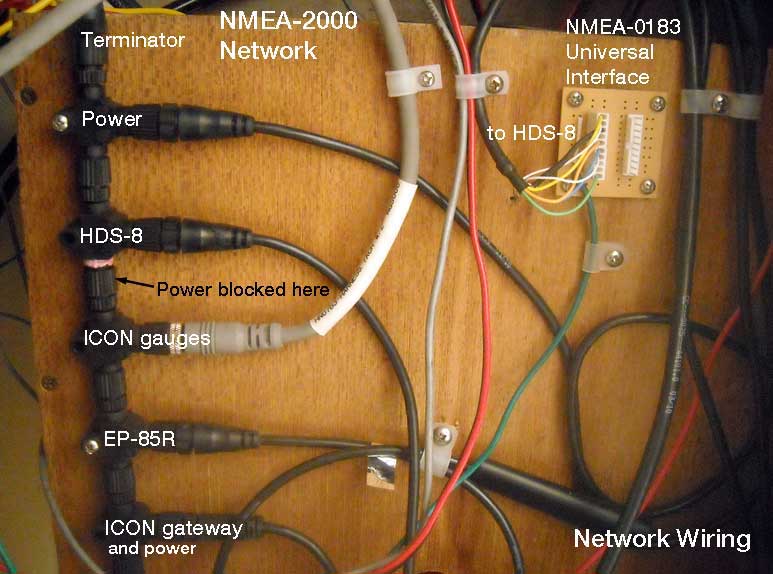
Here is how this network appears as installed. Note that the T-connectors are held to the bulkhead in only two places. Those fasteners are also not tightened completely. This leaves the assembly of multiple T-connectors free to align itself as it wants, based on the alignment of the actual connectors in each device. I think it is a mistake to mount every T-connector with a fastener and to tighten it firmly to the bulkhead. The pilot holes for the fasteners might not be perfectly aligned, and by firmly screwing-down each T-connector you could be creating a misalignment of that connector with its two mates. (Also note that I did not follow my own advice when I put this network together, that is, the power is not on the socket connectors but rather on the pin connectors toward the expansion portion of the network. I will have to correct this next time I get to it.)

Image

There are several ways to block the power in the network backbone wiring in a T-Connector. A special power-block insert device can be used; or a regular T-connector can be modified.

The GARMIN company makes a special NMEA-2000 DeviceNET Micro connector device that can be inserted at any point in a network backbone or daisy chain of network T-connectors. It carries the signal and shield circuits through the device but interrupts the power circuit.

NMEA 2000® Power Isolator
https://buy.garmin.com/en-US/US/shop-by-accessories/connectors/nmea-2000-power-isolator/prod74432.html

This is a good method to employ to isolate the power on a network, but there is one problem: the physical arrangement of the actual connectors in the body of the plastic T molded part are not the same as other manufacturers. When this device is inserted in a daisy chain of T-connectors from other brands, for example Lowrance devices, the power block won't be oriented in the same plane as the rest of the connectors. This will make it impossible to mount the assembly of T-connectors to a bulkhead, as the Garmin connector won't be aligned correctly.

Another method to block the power is to modify a conventional network T-connector. This is the method used in my boat's network and shown in the illustration above. The contacts for the power circuit are removed from the actual connector. One method for accomplishing this is to work on the female (socket) connector. Using a drill bit that is smaller than the plastic hole in the connector body but larger than the tinned socket, the socket can be removed from the connector body. The wire attached to that contact can be cut off, the end covered with heat shrink, and the wire stuffed back into the connector body It is also possible to remove the male or pin connector. Of course, you have to be certain to remove the right contact. For guidance on contact layouts, see a separate article that shows the layout of the circuits in the connector:

NMEA-2000 Micro Connectors
http://continuouswave.com/forum/viewtopic.php?f=9&t=714

Depending on how you modify the T-connector and where it is inserted, it may or may not provide power to the attached device.

jimh
Posts: 11725
Joined: Fri Oct 09, 2015 12:25 pm
Location: Michigan, Lower Peninsula
Contact:

Re: NMEA-2000 Network Power

Postby jimh » Wed May 25, 2016 6:29 pm

For the NMEA-2000 network on my boat, I choose to use a split power arrangement because of problems related to the particular combination of devices I was using. I will explain this in some detail.

The simplest arrangement for powering the network would have been to utilize the ICON Gateway module as the source of the network power. In other words, to get power to the network the ignition key must be ON. This is a good solution if network power is only needed when the associated Evinrude E-TEC engine ignition key switch is in the RUN position. I did not like this arrangement, as it powers up very expensive microprocessor modules in the engine, the E-TEC EMM and the ICON ESM. Both of those components are very expensive replacement parts, and it seemed inappropriate to accumulate key-on time on a $18,000 engine, and its $2,000 EMM and $1,500 ESM modules, just to provide a few milliamperes of 12-Volt power on a small NMEA-2000 network.

I did not want the network power to be simply switch-on by a dedicated control switch, as that would have mean remembering to turn that circuit on (and off, to avoid draining the battery when in storage) with every engine start or stop. Also, I did not want the network power to be run from the engine cranking battery. I wanted the power to come from an isolated, electronics-only battery.

My solution was to use contacts on a relay to provide 12-Volt power to the network from the house or electronics battery, to operate the relay coil from two different sources of power, and to keep those two sources of power from mixing together with steering diodes. (If you don't understand the concept of steering diodes, see this tutorial.)

The two sources of power to operate the relay coil were the ACCY circuit from the ignition key switch (which, actually, with an E-TEC with ICON ETS controls comes from a relay) and a dedicated circuit with a switch. In this way the network would automatically be powered whenever the E-TEC engine was switched on, eliminating the need for me to manually power on the network. And there would be an option to power-on the network when the engine was switched off. I would have the best of both options.

I bought a relay and a relay socket, some diodes, and created a simple circuit to power the network. (More details in a follow-up post below.) To avoid having double power nodes, I used a network power blocker to isolate the ICON Gateway module and its power from the rest of the circuit. This gave me exactly what I wanted. Anytime the engine was running or its key switch was on, the network would have power. If the engine was not running, I could still power the network with a switch.

As it happened, this arrangement did not work very well, not from any fault in my design, but from a peculiarity in the Lowrance EP-85R memory module. I explain this is some detail.

The EP-85R memory module stores data about fuel. It knows how much fuel has been consumed and how much fuel remains in the fuel tank. This data was useful data, and I wanted to be able to access the data, even if the E-TEC engine was not running. But the EP-85R had a bad software bug. If the EP-85R was powered on and it could not find the outboard engine it was supposed to be monitoring for fuel flow, after a while it would decide there was something wrong. The EP-85R would declare its configuration to be invalid, and it would lose all its data. This unusual behavior by the EP-85R wrecked my plans for network power wiring, because any time I powered-on the network manually with the E-TEC engine not running or switched on, the EP-85R would become confused and go into its invalid configuration state.

A data storage device that loses its data is not very valuable. I soon realized that the solution to this quirky behavior was to move the EP-85R device over to the segment of the network where the E-TEC engine would be found, and where the power would only come on if the E-TEC engine were running or its ignition key switch were in the RUN position. This explains why my network now has the power block located where it's shown above. This prevents the EP-85R from being powered on unless the E-TEC engine is also powered-on. This avoids the nasty software bug in the EP-85R from losing all the data.

My initial goal in all of this fiddling with the NMEA network power was to be able to read the data from the EP-85R module when the engine was not running, but--as I discovered when I left the EP-85R module powered by the network overnight while the engine was shut off--the EP-85R would lose its configuration if it didn't see the engine on the network. I ended up having to keep the EP-85R on the network segment that was only supplied power when the engine was also getting power. That left the HDS-8 display sitting all by itself on the other network segment. Since there is no other device to talk to on that segment, the HDS-8 really does not need network power to operate properly. So the whole notion of the split power network was really unnecessary. Of course, I did not know that at the start of the project. The arrangement of network power will be useful if I get more NMEA-2000 devices, such as an external GNSS receiver for the network or a VHF Marine Band radio with NMEA-2000 interface.

jimh
Posts: 11725
Joined: Fri Oct 09, 2015 12:25 pm
Location: Michigan, Lower Peninsula
Contact:

Re: NMEA-2000 Network Power

Postby jimh » Thu May 26, 2016 11:16 am

It is possible to power the network just from the output of the two steering diodes. I chose to use a relay because there is some voltage drop across the steering diodes, and I did not want the power from the ACCY circuit to be used as network power. The ACCY circuit is derived from the engine starting battery. By letting the steering diodes control the relay, I could be certain that the network power was always coming from the isolated House battery.

The steering diodes used have the following characteristics: a peak-inverse-voltage (PIV) of 1,000-Volts; a forward current maximum of 2-Amperes. The 1,000-PIV should be more than sufficient to withstand any voltage transients that might occur on the engine starting battery power line. The 2-Ampere current rating gives a generous margin for the relay power, whose 90-Ohm coil only draws about 0.14-Ampere. The ones I used came from my own parts bin. Here is a suitable choice:

http://www.digikey.com/product-detail/e ... ND/1228206

The relay is an inexpensive, $3.22 automotive relay. There is one Form-C contact. The coil has a suppresor diode.

http://www.digikey.com/product-detail/e ... -ND/807759

To mount the relay, I used a small mounting bracket accessory which provides for easy installation against a bulkhead with a single mounting screw. Crazily, this hunk of plastic costs more than the relay:

http://www.digikey.com/product-detail/e ... -ND/813781

The mounting bracket does not include the actual sockets for electrical contact. They must be ordered separately, at about $0.48 each:

http://www.digikey.com/product-detail/e ... ND/1059803

These contacts require a crimper that can curl the crimp over the wire. Fortunately I have such a crimper. This style of crimp contact is rather common, so it is likely that many generic crimpers can fit these contacts. Feel free to omit the bracket and the expensive contacts; the relay has standard tab connections or you could solder to the contacts.

The toggle switch is the simplest component. Only a SPST switch is needed. I ended up using an illuminated toggle switch, obtained from my local boat dealer. It was Sierra brand switch and costs about $12:

http://www.seastarsolutions.com/product ... hes/#illum

Regarding the illuminated switch, this switch is really versatile. If you want it to illuminate only when the switch is closed and to be independent of the gauge illumination circuit, you can just connect your 12-Volt switched power from the switch contact to the gauge illumination circuit terminal. With this simple wiring, the red indicator illuminates when the switch is in the ON position. This switch was also useful because it fit into an existing hole on the helm panel that I wanted to fill with something.

In addition to letting the relay provide power to the NMEA-2000 network, I also wired a voltmeter in the circuit. The voltmeter reads the House battery voltage, and also provides a positive indicator that there is power being sent to the NMEA-2000 network. I did not want to leave the voltmeter permanently connected to the house power distribution, as it would then always be draining some current from the battery. Sometimes I have (unintentionally) left the primary battery power distribution switch ON for a week or two when the boat is in storage, and I did not want that voltmeter to be draining current all that time. Switching the voltmeter on with the NMEA power circuit seemed like a good way to provide the House battery power to the voltmeter for measurement. Also, seeing the voltmeter in operation is another reminder that the network power has been switched on.