search | FAQ |
profile | register | author help
|
|
|
| Author | Topic: REVENGE Walk-Through Deck Opening Hatch Replacement |
| jimh |
 posted 07-11-2009 09:37 AM ET (US)
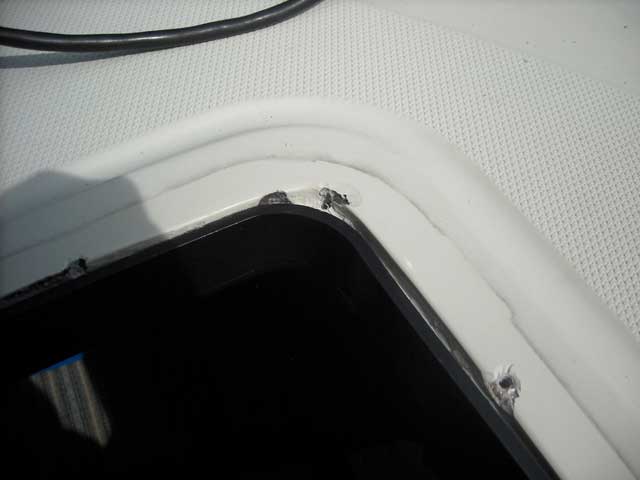
 I replaced the starboard deck opening hatch on my 1990 Boston Whaler REVENGE 22 Walk-Through Whaler Drive. The old hatch suffered a failure of its latch mechanism from an accidental closing when the latch mechanism was jammed under the hatch, breaking part of the base of the toggle bolt retainer. These black molded plastic opening hatches were originally made by GRAY. GRAY was taken over by BOMAR, who then was taken over by POMPANETTE. A suitable replacement hatch is now available at pompanette.com. [See more hyperlinks below.] The appropriate size is G910---1111. This hatch lists for about $216. I ordered one of these hatches some time ago, but I did not get around to installing it until now. I thought the old hatch might be difficult to remove, but it was not. The old hatch came out very easily after its mounting screws were removed. The sealant was mainly around the perimeter of the hatch ring, and it broke loose easily. I cleaned up all the old silicone from the deck. There was a noticeable difference in the color and luster of the gel coat which had been under the hatch for 19 years. I wet sanded with 600 emery paper to help blend the transition and conceal the line. I polished the deck area after wet sanding to restore its lustre. The POMPANETTE G910 hatch is almost an exact replacement. Once you have one installed, it will blend very well with the original hatch. There are some notable differences. The dimensions of the opening in the deck needed for the POMPANETTE hatch are just slightly smaller than the original hatch. The difference is about 1/8-inch. This means that a new POMPANETTE hatch will fit into the existing opening and the existing lower trim ring. The latching mechanism of the POMPANETTE hatch is a lever; the old GRAY latch was a toggle bolt design. I like the new design. The lifting arm friction lock on the POMPANETTE hatch is a rotating collet; the old GRAY hatch was a sliding friction lock with a knob. I like the old design. The lid of the POMPANETTE hatch has a generous soft rubber gasket that is compressed when closed to seal the hatch. Time will tell if this stays supple and resilient. The old GRAY hatch had a much smaller and firmer rubber gasket. We never had any problems with a leak. The lid of the POMPANETTE hatch when closed covers the base ring of the hatch; the old GRAY hatch had a larger base ring flange which extended about 1/8-inch to 1/4-inch beyond the hatch lid. The POMPANETTE hatch base is pre-drilled for eight mounting screws; the old GRAY hatch was drilled for 12 mounting screws. None of the existing holes in the deck align with any new hole location. Boston Whaler molded into the deck a raised island for the hatch to be installed on. To guide the carpenter fitting the hatch, the inner portion of the island that has to be cut out was indented. On my boat the cut out for the lower ring of the hatch was just about a perfect fit. There was only a small gap between the lower ring and the deck in one corner where the radius of the cut was slightly too large. Because this lower ring fit so well, I decided to leave it in place. The new hatch fits into it with about 1/8-inch clearance. The lower trim ring on both the new and old hatch did not have pre-made holes. As a result, the hole locations on the old trim ring were slightly non-uniformly spaced. If I had used the new lower trim ring it would not have fit into the deck cut out as well, and I would have had to drill eight new holes into the deck from below. Also, the old lower ring is taller and it covers all of the cut in the deck. The new ring is not as tall and would have left the upper portion of the cut in the deck exposed. I reinstalled the old lower ring and sealed it to the deck with a generous bead of silicone sealer. It appeared to me that the original had been sealed with silicone sealer, so I was guided by that choice in selecting a sealant. After I had the lower ring back in place and the silicone sealant was cured somewhat, I repaired all of the existing (12) holes in the deck that would not be re-used. The screw holes were for No. 10 x 3/4-inch sheet metal screws. They were carelessly drilled and no relief was made for the gel coat resin layer, so every existing hole had chipped out segments of the gel coat layer, some quite large chips. I pried out the loose chips and removed any other loose material. I carefully masked with tape all 12 holes. I mixed some WEST System epoxy resin using a small repair kit foil squeeze package. I dripped resin into all the screw holes and covered the exposed laminate where the gel coat resin had chipped away. In this way I was certain that these old holes were now sealed and would not let water into the wooden core of the deck surrounding the hatch area. As I mentioned, the cut out for the old hatch was perfect, that is, it was as small as it could possibly be. However, even with this perfect cut out, the portion of the raised deck island that remained was just wide enough to accommodate the slightly smaller new hatch base flange. The hole layout on the new hatch base put the forward and aft flange holes into solid material. The port and starboard side holes, however, fell right at the point where the deck was molded into the depression for the cut out. I carefully marked all eight new holes. To mark the holes, I first marked and drilled two holes. Then I set the hatch base ring back in place and fastened it with two screws. Then I marked the rest of the holes. I figured that this technique gives me more accurate hole placement. Because there was such a tight fit of the holes, I decided to use No. 8 x 3/4-inch sheet metal screws. They also fit the recessed holes on the new hatch base better than the existing screws. The old fasteners were oval head; the new pre-made holes were for pan head. I carefully drilled the eight new holes. I worked up the hole size 1/64-inch at a time, starting with a 5/64-inch drill so that I could spot the hole center precisely. One or two of the holes ended up having to be drilled in the slope of the deck as it recessed from the island to the cut out. I drilled the holes up to 9/64-inch. I then relieved the gel coat resin layer to a larger 13/64-inch diameter. In spite of my best efforts, I cracked out some of the gel coat on one or two of the holes as I installed a screw. It appeared that there was an air void between the gel coat resin layer and the laminate which contributed to the brittle nature of the gelcoat in those instances. I used a sacrificial fastener to pre-thread all of the holes. In this way I roughed up the head of that fastener in driving it in eight times. Then when I put in the finish fastener it does not have to cut all the threads. This makes it easier to drive and less likely to get the head damaged. Once I had the eight new holes drilled I test fitted the hatch base. The hole alignment was excellent. I gave the deck a thorough cleaning so that the hatch and its sealant would have a clean surface to adhere to. I used acetone for the last wipe down. I put a generous bead of sealant on the hatch base ring, and I set the hatch in place. I installed the eight fasteners, trying my best to not mar their heads. As the hatch base was tightened a small ring of sealant squeezed out all around. I wiped this up with a wet cloth. The project took most of the day, in part waiting for the sealant on the lower ring to cure and for the epoxy to set. I also wasted some time removing and then reinstalling the lower base ring in the cabin.
|
| jimh |
posted 07-11-2009 11:27 AM ET (US)
Two thoughts occurred to me after writing the article above: first, I would never make it as a boat production worker. Boston Whaler probably allots about 15 minutes for the hatch installation, including making the hole cut, which, of course, I did not have to do. Second, if you can re-use the lower trim ring, you may be able to order the hatch without one and reduce the price. |
| home Aside |
posted 07-11-2009 01:05 PM ET (US)
Jimh, I picked up two new hatches for my 1985 Revenge 22 WT at the Boaters World Closeout $100 each, I'll follow your directions, although my originals aren't the best looking they are still fully functional with no leaks, I may wait a while longer before I install the new ones. Pat |
| c_mccann |
posted 07-14-2009 03:49 PM ET (US)
I had to replace my hatch years back. I then had my canvas guy make a Stamoid cover that snaps over the hatch. Now the elements do not get to the hatch- I unsnapped it last week to clean and the hatch looks new after 5 years... |
| Slippery Eel |
posted 07-16-2009 09:24 AM ET (US)
Jim--thanks for posting. From a previous thread I was aware you purchased the new hatches and was waiting for your write up after the install. Nice job. Both of my hold down toggles are broken. My hatches are held down by the tension knob. I have found that after a hard rain while underway or by taking a wave over the bow I get water in the cabin. I plan to purchase and replace both of my hatches in the off season. Hutch |
| Tom W Clark |
posted 07-16-2009 01:02 PM ET (US)
According to the Pompanette web site cited above, the list price for the G910---1111 is $227. Without the interior trim ring and scree, the list price is $188. The part number becomes G910---1100 My curiosity piqued by Jim's account, I just removed one hatch form my 1988 Revenge 25 Walk Through. It is branded as "Gray by Pompanette" It very closely matches the description of Jim's new hatch so I wonder if it is not original to my slightly older boat. Also of note on the hatch's label is the very first sentence: "USE ONLY 3M #5200 CAULKING COMPOUND FOR BEDDING PURPOSES" It appears my hatches were fully bedded with silicone caulk. They both leak like sieves. |
| jimh |
posted 07-16-2009 01:26 PM ET (US)
We were in the same boat (and that is almost not a figure of speech) with our hatch situation. I sealed it closed with a layer of SCOTCH 33+ vinyl electrical tape to keep water from intruding. The irony of the situation has been that since we broke the hatch, which I believe happened in June 2007, the summer boating weather has not been very hot, and we have seldom, perhaps really never, needed the hatch open during the night while we were sleeping aboard. |
| jimh |
posted 07-05-2011 11:41 AM ET (US)
The remaining original hatch broke last weekend, suffering the same fate at the first: the latch retainer mounting post fractured, probably from being inadvertently jammed in the closing. BOMAR still has these hatches available. The price is now $205 for the hatch without trim ring and screen. The screen is $27. I plan to use the existing interior trim ring, as I described above. Delivery may be as long as four weeks. |
| jimh |
posted 08-08-2011 03:05 PM ET (US)
I received the replacement hatch about two weeks after I ordered it. I plan to install it this weekend. I will use my own notes to remember how to accomplish it! |
| jimh |
posted 08-14-2011 04:14 PM ET (US)
This project has been delayed by a weekend of rain. Here are some more notes regarding re-fitting this hatch while I wait for the rain to stop and let me finish: The original hatch and inside trim ring are caulked with clear silicone rubber. I have not experienced any leaks in my boat, and I have slept aboard it, directly under the hatch, for hundreds of nights and in some very intense rain. If clear silicon rubber caulk was good enough for the first 21-years of this hatch, it will likely be good for the next decade or two. There is a small tag on the new hatch--very hard to read and I had to use a magnifying glass--which says: "USE ONLY SILICON BASED CAULKING COMPOUNDS FOR BEDDING PURPOSES." The label also says, "Gray by Pompanette." Based on this, I will use GE Silicon II clear sealant for bedding the trim ring and caulking the hatch to the deck. Having experience with the adhesive power of 3M-5200, I would never use it for this hatch. You'd have to cut the hatch away or chisel the hatch trim ring away from the boat laminate if you bedded it with 3M-5200. The new hatch is a slightly loose fit inside the OEM trim ring, and this allows the position of the hatch to be adjusted so that the new screw fastener holes can all land on solid areas of the deck. When removing the existing hatch, some of the screw fasteners on that hatch missed the solid deck and were boring into the edge of the cutaway deck. By manipulating the new hatch fore and aft and side to side within the play allowed by the trim ring, you can align all the pre-drilled holes in the new hatch with solid material on the deck. |
| jimh |
posted 09-03-2011 09:30 AM ET (US)
The new replacement hatch has been installed. It received the acid test of its weather sealing yesterday. We were driving up to Northern Michigan for a Labor Day weekend of boating. We had the cover off the boat. We left home in fair weather and sunshine, but as we drove North the sky took on the hazy look of a summer storm approaching. In a long stretch of highway with no overpasses (to hide under) and no exits, the boat was drenched in a heavy downpour for ten minutes. I don't think the hatch will be exposed to so much rain and certainly not rain driven into it at 45-MPH. Finally we reached an exit, where I pulled off and we hid under the canopy of a filling station at a big truck stop. After about ten minutes the downpour ceased, the line of thunderstorms passed, and we could get back on the road. When we finally reached our destination and launched the boat--mercifully without any further rain--I was curious to see if there were any leaks from the new hatch. No leaks--the hatch seal was completely weather tight, both the silicon seal of the hatch ring to the deck and the rubber seal of the opening portion of the hatch. We're putting this down as a win for GE Silicon II sealant. |
| RevengeFamily |
posted 09-04-2011 05:28 AM ET (US)
Jim, I have followed your advice regarding replacement of the deck hatches on my 1990 22 Revenge Walk-Through and have had similar success. However, she has always leaked rain water through the anchor well hatch. The water ends up finding it's way inside the cuddy and eventually puddles inside the forward storage area. Two years back, I removed the "bulk head" that seperates the cabin from the anchor well. Cleaned away all the silicone caulk from the previous owners attempts at stopping the water intrusion. Sanded and refinished the mahogany blocks and rebedded them in 3M 4200 sealant. Re-installed the bulkhead. After all that work, I still have a leak. Do you or have you suffered from this malody? If so have you been able to solve the dilemma? Have I missed something that others have discovered? Norm |
| newt |
posted 09-04-2011 01:36 PM ET (US)
On my Revenge, water on the cockpit deck can run up into the cabin along the sides of the boat. The bulkheads are not caulked where they meet the deck. Perhaps you are getting water in your cabin the same way. |
| jimh |
posted 09-08-2011 05:29 AM ET (US)
Yes, I have also seen the mysterious appearance of water in the forward cabin sump in my Boston Whaler REVENGE 22 W-T. There was some in the sump after this rain that we noticed after we launched the boat off the trailer. I think it comes in from the deck. When the boat is on the trailer and being towed and you descend a grade, the bow will be lower than the stern. Any water in the back of the boat can run forward and find its way into the cabin. There is typically always a bit of water in the cockpit. |
| RevengeFamily |
posted 09-12-2011 06:30 AM ET (US)
Yes, I do get water in the sump in the cuddy if I trailer in the rain or if I wash it down before unhitching. (the bow is a bit low when I'm hitched up) The water I'm speaking of is actually under the trapezoid shaped forward cushion. It puddles inside the storage locker of the same shape underneath the cushion. Even when setting in the driveway, it will leak through the anchor hatch and into the cabin space. And this is when the trailer and boat are 1-2 inches higher than the stern Before I redo the work I've already performed, I was curious if anyone else has had a similar dilemma and if so, how have they solved the problem. Norm |
| Eagleman |
posted 09-12-2011 08:05 PM ET (US)
I get water in the anchor storge area in our 1991 25'W/T Revenge. I originally thought water was coming through the line depression area under the forward hatch. I installed/glued a vertical piece of pillable rubber type flap to cover the line depression area, the water still got in. I can't figure how water gets into the forward anchor storage area either. Unless some how it getting between the contact point where the upper deck is fastened onto the hull. I've tried different bow positions when it on the trailer, up, down, level rain water still gets into the front area. I've been looking water in all the wrong places............. |
| Buckda |
posted 09-15-2011 02:43 AM ET (US)
Russ - I believe your water problem may be due to a leaking cabin gasket. Whaler published a fix for this on the Outrage Cuddy models. |
| Eagleman |
posted 09-15-2011 01:15 PM ET (US)
Dave, I think you may be right on, that would make sense to me. Has the Boston Whaler fix for the Outrage Cuddy been posted on this the CW website,if it has I couldn't locate the article. Thanks for the update, Paula & I are doing well, see you on the freshwater one of these days again! |
| Chriscz |
posted 09-22-2011 12:51 AM ET (US)
Is there any known replacement part for the lifting arm friction lock for the hatch cover? Or do you need to replace the whole hatch? |
| jimh |
posted 03-30-2013 09:37 PM ET (US)
Most of the hyperlinks given earlier in this thread to Pompanette are now dead links. The 900-series hatches are still available, I believe, and here is a link to the catalogue pages that now give information about the hatches on the Pompanette website: http://pompanettellc.com/wp-content/uploads/2016/06/Bomar_Catalog-rev.09.13.2016.pdf 900-Series Hatches |
| Tates |
posted 04-03-2013 08:25 PM ET (US)
Good information for replacing the 20 + year hatches , Jimh Any pictures of the installed new hatch? Thanks for the infomation TT |
| jimh |
posted 04-03-2013 11:46 PM ET (US)
Recently I thought that I must have a picture of the hatch replacement process. I always take pictures of this sort of project. I searched through about 12,000 digital images I have in my iPhoto library, but I could not find a single picture that showed the hatch replacement project. I think I must have forgotten to take any pictures--twice, since I replaced both hatches. Sorry about that, but I seem to have no pictures of the process. I can take a picture of the new hatch when I get the boat out of storage, but I don't think that is going to be too informative. |
| jimp |
posted 04-04-2013 10:02 AM ET (US)
JimH - Here are some photos of my 1990 Revenge 22- W.T. foredeck OLD hatch repairs of 2007. I have nothing on the new hatches. http://smg.photobucket.com/user/jimp/library/ Revenge%20Foredeck%20hatches JimP |
| Tates |
posted 04-04-2013 10:23 AM ET (US)
Thanks for checking Jimh,Thanks Jimp for the pictures thats what I need to do on my 25'Revenge. thanks for posting the pictures. TT |
| jimh |
posted 06-26-2013 08:45 PM ET (US)
I came across some pictures I had taken during one of the hatch replacements, and I added them to the thread. On our June 2013 cruise we had one night of very heavy rainfall, but not a drop came into the cuddy cabin from either of the two replacement hatches. |
Powered by: Ultimate Bulletin Board, Freeware Version 2000
Purchase our Licensed Version- which adds many more features!
© Infopop Corporation (formerly Madrona Park, Inc.), 1998 - 2000.