ContinuousWave
 Whaler
 Moderated Discussion Areas
ContinuousWave: Post-Classic Whalers
Finding Room on 170 MONTAUK Console for More Gauges
Moderated Discussion Areas
ContinuousWave: Post-Classic Whalers
Finding Room on 170 MONTAUK Console for More Gauges


search | FAQ |
profile | register | author help
|
|
ContinuousWave Whaler Moderated Discussion Areas
ContinuousWave: Post-Classic Whalers
Finding Room on 170 MONTAUK Console for More Gauges
|
| Author | Topic: Finding Room on 170 MONTAUK Console for More Gauges |
| Pilot |
 posted 02-29-2008 10:28 PM ET (US)
posted 02-29-2008 10:28 PM ET (US)  
I'd like to add SmartCraft gauges to my new 170 Montauk. I can swap out the tachometers, but there's no place or room to add the speedometer gauge, which has the balance of the digital readout data. Has anyone come up with a good place to mount the Speedo or any modifications? Thanks,
|
| jimh |
posted 03-01-2008 11:03 AM ET (US)
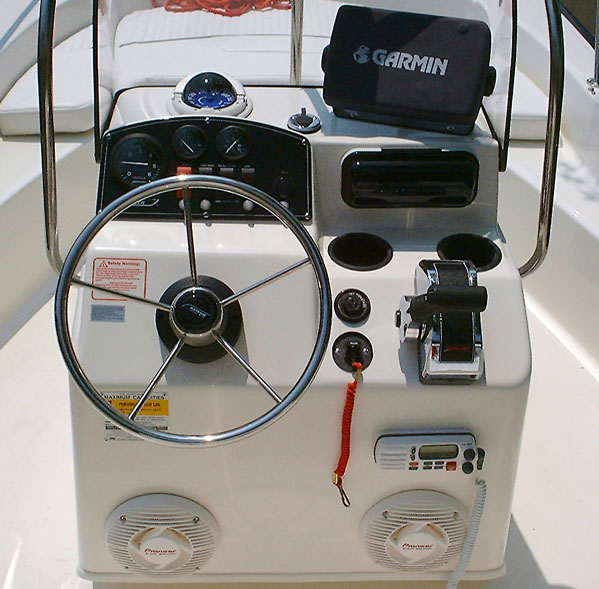
This is an interesting problem. The instrument panel on the dashboard of the 170 MONTAUK was probably not designed with the idea of mounting two 3.5-inch gauges on it. For many years the 170 MONTAUK was sold with motors which were not equipped with the SmartCraft option. Now that the 170 MONTAUK is being sold only with motors that have the SmartCraft option, it might be consideration that the instrument panel layout be modified to accommodate two 3.5-inch gauges, such as suggested here with the SmartCraft SC-1000 tachometer and speedometer gauges. As for retrofitting two 3.5-inch gauges onto the existing panel, you may have to consider obtaining a new, undrilled panel and fabricating your own layout. I suggest you contact Boston Whaler and see if you could purchase a new panel without any holes drilled in it. Or, alternatively, make your own instrument panel from aluminum, using the current panel as a hole template and guide, except change the gauge hole layout to suit your needs. I searched for but could not find a good image that shows the current instrument panel layout of the 2008 Boston Whaler 170 MONTAUK. If anyone has an image please give us a look at it. (Email me the image and I will post it here if you do not have a web hose available for it.) Does your console look like this?
|
| Feejer |
posted 03-01-2008 11:11 AM ET (US)
Jim, is that a Garmin 2006-3006? |
| GreatBayNH |
posted 03-01-2008 12:16 PM ET (US)
Garmin 2006C http://continuouswave.com/whaler/cetacea/cetaceaPage58a.html |
| Feejer |
posted 03-01-2008 12:37 PM ET (US)
Thanks |
| WT |
posted 03-01-2008 02:24 PM ET (US)
I had asked my Boston Whaler dealer about installing Smartcraft SC1000 gauges on my 170 Montauk. I vaguely remember that the ballpark pricing would be over $1000. Since there are new gauges out, perhaps the SC1000 pricing has come down. Jimh is right, the dealer said they would get a new plate and drill holes to rearrange the gauges. I'm not sure if I want to spend $1000 to get the addition of a fuel flow meter and speedometer. :-) Warren |
| Buckda |
posted 03-01-2008 02:52 PM ET (US)
It is suprising to see how little usable space there is aboard these new consoles when compared to the consoles from the 70's and 80's. They did manage to add two molded cupholders though! Could you move some of the smaller guages behind the steering wheel? That would free up space above. You could cut a piece of teak to match the curvey black piece and really dress up your Whaler while adding guages. Just a thought. Dave |
| Pilot |
posted 03-01-2008 05:16 PM ET (US)
I did foward the owners manual gauge layout to Jim H. The console above does look like mine. There's a waterproof Clarion Stereo control (3" dia.) right of the shift . . . and a Sirius mushroom antenna just to the Right of the Anchor light socket. Nothing else installed yet. No Fish package so no compass yet. Would like to put a Chartplotter same place as above and radio on the right panel or possibly lower - same as above but was worried about banging it with knees. I went to see a guy today about a Mahogany or Teak gauge plate or possibly a gauge housing where the compass is in above photo. This gentlemen is an artist (registration boards in place of viynal leters) were quoted at 450.00 painted or 750.00 carved - but they're beautiful. Guesing guage housing would be 1,500. My only reservation is I don't want it to look like an after thought. Seabob4 has been helping with this dilema and also suggested trying to get a non-drilled panel . . . but I'm not sure how easy that would be. Has anyone had experience getting these type of requests answered from BW? Thanks for the Ideas. Richard |
| Casco Bay Outrage |
posted 03-01-2008 06:27 PM ET (US)
Contact Flounder Pounder fpmarine.com for a panel. They carry surplus Boston Whaler parts. If they don't have one, call Sue at Twin Cities Marine and order. Other option is to fabricate a blank panel without logo. Not hard to do. If it was me, I would fabricate a new panel, add gauges to the panel and move all the switches to the area between the wheel and ignition switch. Install a 4 or 6 gang switch panel (vertically mounted) like this. http://www.boatersworld.com/product/196901722msk. htm?bct=t13046503%3Bcielectrical-boat%3Bcipanels-wiring%3Bcipanels |
| Pilot |
posted 03-01-2008 06:55 PM ET (US)
Thanks - Just sent e-mails to both. |
| jimh |
posted 03-01-2008 06:58 PM ET (US)
Here is a look at fabricating a new instrument panel and re-wiring: Conventional Gauge Rigging The SmartCraft gauge installation ought to be straightforward. Here is a prior article on that topic: SmartCraft Installation On 2005 130 Sport with 2005 Mercury 40-HP Four-stroke EFI Engine |
| Pilot |
posted 03-01-2008 07:36 PM ET (US)
Thanks . . . I'll read through. Second thoughts type question. This is a 2008 50th Anniversary boat . . . not much in the way of designation . . . but should I think twice about modifying it vs. keeping it all original?? I know it's mostly personal preference . . . but any thoughts would be welcome. Thanks, |
| GreatBayNH |
posted 03-01-2008 08:55 PM ET (US)
Re: "For many years the 170 MONTAUK was sold with motors which were not equipped with the SmartCraft option" How is it that the 2005 130 Sport with 2005 Mercury Four-Stroke EFI (as referenced in article above) is able to have the SmartCraft gauge? I assume my 2006 Mercury four cycle EFI engine is the same non-SmartCraft enabled design. Or am I missing something? |
| jimh |
posted 03-02-2008 09:31 AM ET (US)
The reason that other boats in the Boston Whaler line were able to use SmartCraft instruments while the 170 MONTUAK was generally not sold with motors which could use SmartCraft instruments is simple: the 170 MONTUAK was sold with different motors than those other boats. The motors sold with the 170 MONTAUK were mainly the 90-HP classic carburetor (which did not have SmartCraft) or the 90-HP four-cycle motor which was a hybrid motor that consisted of a powerhead manufactured by Yamaha and mated to a Mercury midsection, gear case, and cowling. This engine had an ignition controller that was made by Yamaha, and the ignition controller or engine control unit (ECU) was not SmartCraft capable. The lack of SmartCraft instrumentation on a motor sold by Mercury is often a reliable indicator of a motor whose powerhead was made by Yamaha or others. Although Mercury has expanded the SmartCraft instrumentation to just about all of their outboard motors, this was not always the case. Introduction of SmartCraft proceeded slowly. In 2003, for example, the only motors in the Mercury product line which were capable of being fitted with optional SmartCraft gauges were the following: FOURSTROKE: 225, 60 ,50, 40, 30 (EFI models only) There were 32 other outboard motors in the product line which did not support SmartCraft. By the way, note that the 225-EFI FOURSTROKE was SmartCraft even though it was a Yamaha motor. This is the only exception that I can think of to the rule proposed above regard using SmartCraft to identify an all-Mercury motor. [Footnote to the above: I checked in the 2004 Mercury catalogue and the 225-HP FOURSTROKE was NOT listed as being SmartCraft capable. I suspect that the listing in the 2003 Catalogue may have been a misprint or represented higher expectations than were actually realized.--jimh] |
| jimh |
posted 03-02-2008 09:50 AM ET (US)
Richard sent these two sketches of the console which show the existing layout and some suggested changes:
|
| jimh |
posted 03-02-2008 10:04 AM ET (US)
I am not a big fan of cutting holes in the console laminate, so I tend to resist solutions which require that. On that basis, I would probably fabricate a new panel and shift the gauge layout to fit the two larger gauges onto the panel, if a decent arrangement could be found which would accommodate all the elements. Clarify one thing for me, please. On the new, stock, 170 MONTAUK console, is there a small compartment installed on the upper right of the console? This is shown in the photograph above from TABASCO, an early 2002 model. But it is not clear to me now if that compartment is a stock item (then or now) or was added. |
| jimh |
posted 03-02-2008 10:14 AM ET (US)
Well, a big tip of the hat to Boston Whaler. I found the answers to several questions using this resource: http://www.whalerparts.com/Diagrams/2008/170%20Montauk/09201170MTSHT1-4. pdf As for getting a blank panel, it looks like that is available as item 63 in the above document, sheet 4 of 4, Bill of Material, part number 1848341. However, it looks like the circuit breakers are already installed, so it may not be a good solution. As for the glove box compartment, I don't see it listed. I am assuming it is not a stock item. That Whaler parts website is a bit obscure. I didn't see an obvious link to it from the main Whaler website. |
| glen e |
posted 03-02-2008 10:36 AM ET (US)
we have had good luck with black powdercoated aluminum plate or black plex/lexan for dash's....talk to the guys in ft laud at prospect plastics - a fabricator for the builders in s fla...www.prospectplastics.com |
| jimh |
posted 03-02-2008 10:52 AM ET (US)
On the proposed locations for the new gauges: I like the location of the SC-1000 tachometer and speedometer on either side of the steering wheel. Check to see if that area is clear. There may be some interference with wiring or components mounted behind the panel. I like the location because the gauges will be in direct line of sight with the wheel. I don't think you could read them as well if they were mounted to the right. The drawback to this might be the access to the push button controls on the gauges. You would have to reach around or through the wheel to get to the buttons. Your idea of making a custom housing for the new gauges is also intriguing. If the housing were of a pleasant design and its construction well done, it would be a very nice solution. It would also have the least impact on the "stock" condition of the boat. On the radio location: The dash panel to the right and behind the drink holders would be a nice place to install the radio, although you will have to cut into the laminate. Be sure you like the radio you are going to install! This location will allow you to see the radio display panel. On a modern radio with Class-D DSC capability it is very desirable to be able to see the display panel of the radio because much of the operation of the radio is menu-driven. You have to see the display to operate the radio. This makes putting the radio out of sight less attractive than it used to be. On older radios there was not much need to see the display other than perhaps to see what channel you were on. |
| Pilot |
posted 03-02-2008 12:28 PM ET (US)
Thanks for all the info / links. It did look like part 63, which is listed as blank, is showing the switches & 12 volt accessory - which still make two 3 3/8" gauges tough. I've sent e-mails to BW - we'll see what they come back wtih - but at least now I can refer them to part 63. Thanks, |
| Pilot |
posted 03-02-2008 12:29 PM ET (US)
Forgot to reply - the right console area just behind the drink holders is completely blank ... Richard |
| Casco Bay Outrage |
posted 03-02-2008 01:05 PM ET (US)
While you are doing the right thing, creating various iterations, keep this in mind. When considering location, also consider the item's use. Important gauges should be in the prime viewing location. GPS is viewed more often than VHF. Switches are used less often then gauges I think moving your switches down will give you room for all the gauges in a key location. Once removed, in your new blank panel (Left to right) tach in same location, stack the water pressure and Volt meter vertically and new gauge on right. I would move the 12v receptacle. If you have space issues when locating VHF, you could get a unit that has the remote mic. This type allows you to mount the radio inside the console and have just the mic on the console. Saves a big hole from being cut as well. CBO |
| L H G |
posted 03-02-2008 02:49 PM ET (US)
You guys are taking the wrong approach. Simply remove the analog tachometer, and install a Smartcraft SC1000 System monitor gauge. It's the same size as the tach, and gives you all the functions you need for a Montauk sized boat, including a large digital readout of RPM. Samll analog gauges can remain and will still function. See Mercurymarine.com for the details. I think this guage costs about $350, and you can install it yourself, since the newer engines have the Smartcraft cable in the ignition harness. If your engine is a little older, you will need the Smartcraft blue cable from engine to console, also not expensive. |
| GreatBayNH |
posted 03-02-2008 03:30 PM ET (US)
The small compartment installed on the upper right of the console on TABASCO's early 2002 model Montauk 170 appears to be an standard off-the-shelf stereo face cover protecting the head unit of his Blaupunkt stereo. From the factory that space is blank. The factory installed VHF radio gets installed there if you ordered that option. |
| jimh |
posted 03-02-2008 05:10 PM ET (US)
The SC-1000 System Monitor--not my first choice. You have to scroll through a series of single displays. The twin SC-1000 tachometer and speedometer display is a much better set up. You also get the cool pop-up functions when you hit the tilt control. You can see four values at once and other automatically. Much better information display. Most of the the SmartCraft boats I have seen, about two dozen, have the twin instruments. And that is not to mention the round version of the SC-1000 Information Display looks like a gauge we threw overboard on our sailboat when we updated the electronics in the late 1970's. Maybe I am missing its retro-chic appeal. |
| WT |
posted 03-02-2008 05:56 PM ET (US)
How about this option? Replace the stock analog tach with the SC1000 Tach. Will the SC1000 tach read all the information available? Or do you need to have both the SC1000 speedometer and SC1000 Tach in order to read all the Smartcraft information? AVAILABLE VESSEL INFORMATION * Troll Control™ * Digital Speed * Engine Alarms |
| swist |
posted 03-03-2008 07:43 AM ET (US)
You really acnnot install any accesory to the immediate right of left of the steering wheel on that boat. The steering mechanism and cables are in the way. The most annoying thing when I bought my 170 MONTAUK (used) was the presence of the useless stereo system in what was previously the most valuable free real estate on the console (the space above the cupholders). |
| WT |
posted 03-03-2008 11:23 AM ET (US)
I just called Mercury Marine. You would have to buy both the SC1000 tach and speedometer in order to get all the Smartcraft information. For the 90 FourStroke you would also need to buy a rigging kit that comes with a harness and 2 sensors. Warren |
| glen e |
posted 03-03-2008 11:31 AM ET (US)
a 5 x7 vesselview and you can get rid of ALL the guages. |
| L H G |
posted 03-03-2008 02:35 PM ET (US)
Any chance that the smaller, square System Monitor display would fit on the right side, keeping the existing analog gauges? Or maybe in the hole from the killswitch, which could be eliminated? |
| Fish Stick |
posted 03-03-2008 04:57 PM ET (US)
Pilot, This is just my personal suggestion. While I like the idea of having both the Smart Craft Tach and Speed guages for complete information, I would suggest there needs to be a compromise. Definately replace the existing Tach with Smart Craft. To eliminate rebuilding the console, just read the speed information from your GPS. It will be more accurate anyways. -Joe |
| Pilot |
posted 03-04-2008 08:33 PM ET (US)
I received the reply (below) from Boston Whaler. Seeing the panel might be available, I've done a couple of potential gauge layouts (shared with Jim H for potential posting) However, I'm not sure if I like how they look and might just do the Tach in the existing hole. Message: If you'd like, I'm sure you can order a custom panel direct through the manufacturer of Whaler panels...Ultra Panel Marine...305-888-7709. The Whaler part# for the blank panel with switches is 1848341. Thanks, |
| jimh |
posted 03-04-2008 10:45 PM ET (US)
This discussion demonstrates an interesting phenomenon: just because you have a 17-foot outboard boat doesn't mean you don't want to have all the fun stuff added on it. I think Boston Whaler ought to take a look at the instrument panel on the 170 MONTAUK and see if they can make a minor change so that it would be easier to add the dual 3-inch gauges. Richard's boat can be the prototype. |
| erik selis |
posted 03-05-2008 04:39 AM ET (US)
I made an on-scale image of how it could look with the dual 3.5-inch gauges. There is some re-wiring but I think this would always be the case. If you start from a blank standard plate it should look like this: http://i25.photobucket.com/albums/c86/erik069/170MontaukConsole_Test.jpg Erik |
| erik selis |
posted 03-05-2008 06:36 AM ET (US)
I just checked in a bit more detail on my own Control Panel if the layout above would be possible. It should fit. However I raised the fuses a bit from the bottom just to make sure they would clear the cutout. See the new drawing. http://i25.photobucket.com/albums/c86/erik069/170MontaukConsole_Test-1. jpg The fuses have a rectangular shape and need to be rotated 90° to be able to be positioned this close to each other. There is plenty of room to bring the swithches closer to each other compared to the original layout from Whaler. The fuses under the switches are the limiting factor. If we reposition the fuses and rotate them 90° we can place both the switches and fuses much closer to each other creating just enough space to reposition and place the second 3.5-inch gauge. Erik |
| Casco Bay Outrage |
posted 03-05-2008 09:19 AM ET (US)
Nice work Eric! CBO |
| GreatBayNH |
posted 03-05-2008 10:16 PM ET (US)
Could the fuses go above the switches and move the switch labels below the switch rather than above? |
| erik selis |
posted 03-06-2008 04:45 AM ET (US)
Thanks CBO, I'm glad someone appreciated the work. GB, I think your proposal should be feasible. It's a good idea in that you only need one set of labels. Note that the bilge pump is not fused so it would be logical to then place the fuse for the 12V outlet right beside the outlet itself. If I have time I'll make a second proposal drawing. Erik |
| erik selis |
posted 03-06-2008 06:55 AM ET (US)
 |
| GreatBayNH |
posted 03-06-2008 08:07 AM ET (US)
That's the money shot! Nice work! The Boston Whaler logo is maintaining its original position as well with this layout.
|
| swist |
posted 03-06-2008 08:42 AM ET (US)
It's not hard to drill these holes oneself with the appropriate holes saws and other bits. And this also gives you an excuse to rewire the whole instrument panel to some decent standards (squared off wiring not burying each gauge/control, DC + and - busbars for the many connections to these points rather than daisy chaining them, and some sort of raceway to carry wiring between devices rather than point to point). I do DC wiring for a living and factory Whaler instrument panel wiring wouldn't be acceptable in any industrial application. |
| Casco Bay Outrage |
posted 03-06-2008 04:35 PM ET (US)
I agree with Seth. That last link is the best iteration so far. Someone should send that to Boston Whaler. What an improvement over the stock arrangement. Way to go Erik and company! CBO |
| Pilot |
posted 03-06-2008 10:02 PM ET (US)
Erik - Panel looks great . . . Seabob4 has a connection with Ultra Marine Panel (fabricator of the original BW instrument panel) - perhaps they can fabricate this layout. Thanks for the interest in this topic. It's produced a better 'mousetrap'! Thanks, |
| Pilot |
posted 03-15-2008 12:24 PM ET (US)
FYI - I just ordered the SmartCraft Gauges from Seabob4 (Bob Christiansen) to build the panel. He's also helping get an OEM panel cut to new specs to accomodate the Gauges. Hopefully we can get a picture posted when completed. Richard |
| jimh |
posted 03-15-2008 04:46 PM ET (US)
Pilot--Yes, send pictures when you get the panel and gauges. I think there will be a lot of interest in seeing this idea realized. Good going. |
| GreatBayNH |
posted 03-16-2008 01:27 PM ET (US)
Now that I look more and more at the final dash is it possible to move the fuses back under the switches? Then the original switch label label can be left intact as well. |
| erik selis |
posted 03-16-2008 01:53 PM ET (US)
No, not enough space. |
| Pilot |
posted 04-12-2008 10:15 PM ET (US)
The Custom Montauk instrument panel has been manufactured and the SmartCraft Gauges received - Thanks to Bob Christiansen - he's been great to deal with. You can see photos here: Now the panel and gauges are in the capabable hands of Chesapeake Whalertowne in Grason Maryland for expert installation into the new boat. They've also been great throughout the process. I'll post the final installation when all finished. Richard |
| erik selis |
posted 04-24-2008 08:11 AM ET (US)
Looks nice Richard. Any news when the wiring will be finished? Erik |
| Bulldog |
posted 04-25-2008 06:42 AM ET (US)
Wow, this thread is what CW is about. Pose a question, discuss, then design build, all with a bunch of guys from around the world. The panel looks great!....Jack |
| Feejer |
posted 04-26-2008 10:07 AM ET (US)
Looks Sweet |
| Casco Bay Outrage |
posted 06-09-2008 09:31 PM ET (US)
Richard- Any update, photos, review???? |
| nydealer |
posted 06-12-2008 07:38 AM ET (US)
Probably entering my thoughts too late, Eric, layout looks great but you can save space by removing the Volt and Pressure guage as they are displayed on the Smart Craft. |
| seabob4 |
posted 06-13-2008 06:32 PM ET (US)
nydealer, Yes, you are correct about not having the (2) 2" gauges, but that is what Rick McManus wanted, and due to the efforts of many on in this community, it got done, thanks to the good people at Ultra Panel. Boatowners, especially Boston Whaler owners, are a very proud bunch, very dynamic, and want their boats set up the way they want so that their comfort level is at it's highest. There are many buyers of boats that you might wonder about, from a "brains" standpoint. But Whaler owners are one of those groups. I supplied Rick with those gauges, and even though he knew that the Smartcraft gauges could display Voltage and Water Pressure, he wanted those gauges. For his reasons. You know what? Thanks to Erik, Ivo at Ultra Panel, and I guess myself for helping Rick save some money, the end product looks like a factory install and, most importantly, set up Rick's helm the way he wanted. Sorry to get long winded, but it took some time and some effort, especially communication, and it worked. You want to see how particular Whaler Owners can get? Check out Jim McPadden's boat. Scrimshaw is is screen name. Absolutely AWESOME boat. Sold him a Seastar system with a back mount 2.4 helm. That took some time and effort, but the results are amazing. Original look with modern equipment. I love his boat, and he has a tremendous family that use it. Sometimes, things don't appear as they really are... Good luck in the business. Times are tough right now... |
| seabob4 |
posted 06-13-2008 06:34 PM ET (US)
nydealer, Yes, you are correct about not having the (2) 2" gauges, but that is what Rick McManus wanted, and due to the efforts of many on in this community, it got done, thanks to the good people at Ultra Panel. Boatowners, especially Boston Whaler owners, are a very proud bunch, very dynamic, and want their boats set up the way they want so that their comfort level is at it's highest. There are many buyers of boats that you might wonder about, from a "brains" standpoint. But Whaler owners are not one of those groups. I supplied Rick with those gauges, and even though he knew that the Smartcraft gauges could display Voltage and Water Pressure, he wanted those gauges. For his reasons. You know what? Thanks to Erik, Ivo at Ultra Panel, and I guess myself for helping Rick save some money, the end product looks like a factory install and, most importantly, set up Rick's helm the way he wanted. Sorry to get long winded, but it took some time and some effort, especially communication, and it worked. You want to see how particular Whaler Owners can get? Check out Jim McPadden's boat. Scrimshaw is is screen name. Absolutely AWESOME boat. Sold him a Seastar system with a back mount 2.4 helm. That took some time and effort, but the results are amazing. Original look with modern equipment. I love his boat, and he has a tremendous family that use it. Sometimes, things don't appear as they really are... Good luck in the business. Times are tough right now... |
| seabob4 |
posted 06-13-2008 06:35 PM ET (US)
Sorry guys, I left out the "not" in front of one of those groups. My apologies. |
| Ridge Runner |
posted 06-17-2008 11:05 PM ET (US)
The panel looks fantastic. Can we get a complete break down on the total cost? |
| Pilot |
posted 06-18-2008 10:53 PM ET (US)
Here are the updated Photo's for the completed panel. http://home.mindspring.com/~rkmcmanus/ Smart Craft Guages - and objective Experience - Design breakthrough / Refine - by Erik Selis. Panel ($90) & Guages ($670) were secured through Bob Christiansen - put a lot of time in to make it happen and very helpful. Panel was installed by the terrific team led by Rick Boulay, owner of Chesapeake Whalertowne in Grasonville Maryland - they're the real deal. The amount of information is terrific. LCD gauges are bit hard to read in sunlight. The pressure guages (LCD & Link analog) are not registering - likely sender unit issue to be repaired. The Trim gauge is not sensitive enough . . . the useful range of the trim at speed only uses about 5% of the gauge range . . . so difficult to read any real difference. will explore claibration . . . but not likley to be a fix. May be more helpful in the slow shallows. Also on the panel: Next is the custom Aluminum Fuel Tank being worked out with Chesapeake Whalertowne - about the same size as the old Pate's. Tank is fabricated and looks great. It will provide fuel remaining to the Smart Craft System (in addition to used, etc.). We're deciding on finishing (powder coat acyrlic, epoxy, etc.?) Thanks to everyone who has helped with their expertise to bring about the beginnings of what I hope will be the Ultimate Montauk! Modern variety of course. Richard |
| Casco Bay Outrage |
posted 06-19-2008 06:57 PM ET (US)
Ahh....the finished project. A thing of beauty. Richard - That is truly fantastic. As someone suggested, you or Rick Boulay should forward this to the head of engineering at Whaler. Enjoy! |
| WT |
posted 06-19-2008 07:02 PM ET (US)
I WANT ONE! Warren |
| Barney |
posted 06-19-2008 09:43 PM ET (US)
Man that is sweet! |
| erik selis |
posted 06-20-2008 02:17 AM ET (US)
Richard, that looks great! Well done to you and also to Bob. I also like that steering wheel. Very nice indeed. Erik |
| Feejer |
posted 06-20-2008 07:24 AM ET (US)
Very Very nice. I hope you post some photos of your new tank along with the specs when your done. Great Job |
| seabob4 |
posted 06-21-2008 09:33 PM ET (US)
Richard, Had a great time working with you, and the results are excellent! I love to see a concept come to fruition. That's a beautiful dash panel, and it looks factory. Unfortunately, Whaler is just trying to stay afloat right now, let alone try new things. Enjoy your boat, and wish all the best to the rest of us who build them! |
| |
Powered by: Ultimate Bulletin Board, Freeware Version 2000
Purchase our Licensed Version- which adds many more features!
© Infopop Corporation (formerly Madrona Park, Inc.), 1998 - 2000.