Dual Battery Wiring
This article describes several techniques for interconnecting outboard motors
and dual batteries. There are two distinct applications: single engine installations
and dual engine installations.
Single Engine/Dual Battery
The use of a single engine and dual batteries
is one of the most common installations found in outboard powered boats.
Interconnection is straightforward.
The diagram below shows the typical wiring.
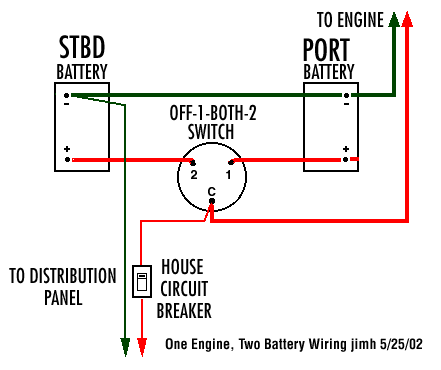 |
Dual Battery/Single Engine Typical Schematic
NOTE: The battery positive leads are shown in red.
The negative leads are shown in green for clarity;
code suggests the use of yellow wire.
Wiring gauge is determined by current demands and length
of the run. Typically 2-AWG is used to connect to
the batteries; 10-AWG is used to connect to the distribution panel.
The single switch is an OFF-1-BOTH-2 switch.
JWH. |
The use of a switch and wiring like this is recommend with dual battery
installations. A brief explanation of the operation of the switch in this circuit
follows.
In the OFF position, the two batteries are disconnected from all loads.
The OFF position is used when the boat is being stored or otherwise not in use.
It prevents any drain from the batteries. This can be useful if a circuit
has been accidently left on, say a cabin lighting circuit or similar drain.
Such a load can completely discharge a battery in a day or two, leading
to an unanticipated dead battery situation when you return to your boat.
On some switches a key lock is provided, allowing the switch to locked
in the off position. The provides another level of security in preventing
the boat from being used when left in storage or unattended.
In the 1 position, all loads and charging currents are connected
to the No. 1 battery (the PORT battery in the illustration).
Starting current for the engine starter motor is supplied by the PORT
battery.
When the engine is running, surplus current developed by its charging circuit will
flowing into the PORT battery. Current to lighting and other loads will
flow from the PORT battery. The STDB battery is completely isolated
and has no load current, nor does it receive any charging current.
In the 2 position, all loads and charging currents are connected
to the No. 2 battery (the STBD battery in the illustration).
Now it supplies current required by starting and running, and it receives
all the charging current from the engine. The PORT battery is totally
isolated.
In the BOTH position, the two batteries are connected in
parallel. This has a number of implications.
Unless the batteries have exactly the same state of charge, the
combined voltage to the two batteries in parallel will sag to a
voltage somewhat lower than the highest battery's terminal voltage.
Current from the higher voltage battery will flow into the lower voltage
battery and begin charging it. As long as the state of charge in one
battery is higher than the other, the lower battery is more of a load
than a source of power. Eventually, the batteries will reach an
equilibrium, and they will both have the same terminal voltage.
At that point they will both tend to supply current to loads
that are attached to them, and they will both receive charging current
furnished by the engine.
It would seem like operating in the BOTH position would be
beneficial, but that is not always the case. Even thought the batteries
will eventually rise or fall to the same terminal voltage when
connected together, they will not necessarily become exactly the same.
A battery (or any source of electrical engery) can be though of as
having an internal resistance. The lower this internal resistance
the greater the current it can supply. The internal resistance will
also affect how the battery absorbs charging current. Even though
they are connected in parallel, it is possible that they will supply
unequal currents to the loads, and it is also possible that they
will accept unequal currents from an the engine charging source.
If the batteries are significantly different in their age, their
type of construction, and their state of charge, this unequal distribution
of current can be more significant. To describe the situation in the simplest
of terms, when two batteries are connected in parallel, they will
probably tend to behave more like the weakest battery of the two
than the strongest.
Paralleling the batteries can come in handy in some situations.
For example, both batteries may be discharged to a point where neither
alone can provide enough current to crank the starter motor,
but combined in parallel they can turn the engine over.
If one battery is fully charged and the other is totally discharged,
connecting them in parallel (by using the BOTH position) can cause
very high currents to flow between the batteries. Extreme heat
can be generated by the sudden charging of the discharged battery.
Use caution in this situation. It is better to recondition a
discharged battery by slowly re-charging it with an AC-operated
battery charger.
The arrangement of the contacts of the typical OFF-1-2-BOTH
permits the operation of the switch in the range of 1-2-BOTH
without ever disconnecting the batteries from the load or the outboard
charging circuit. This is important, as it is possible to cause
damage to the charging circuit if the battery is disconnected while
the engine is running. By choosing the path of rotation of the switch,
it is possible to change from 1 to 2 without moving
through the OFF position.
Dual Engine/Dual Battery
Dual engines and dual batteries require careful interconnection to prevent damage
to the engine charging circuits. Three approaches are shown,
one as believed to be used by Boston Whaler, a second alternative
approach (that I have since discovered is described by West Marine
in their catalogue), and a third configuration which I am currently
using in my Boston Whaler.
The Problem
The use of dual batteries in boats is quite common, but most often
the dual batteries are associated with just one engine or charging source.
The wiring and interconnection of two batteries and one engine alternator
is quite well covered in the boating literature. There is a less common
and less written about situation that arises when there are two batteries
and two engines or charging sources.
The problem with having two charging sources is that care must be taken
to not connect the two chargers together in a way that damages one or
both of them. Experience suggests that if two engines' chargers are
wired in simple parallel and charge a common battery or bank of batteries,
it is not unusual for one of the chargers to suffer a burned out stator coil.
The cause of this is most easily explained if a fundamental rule of
charging circuits is understood: the charger should never be operating
without a load (a battery) connected.
In circuits with parallel connection of two engine charging circuits,
it is likely that the voltage produced by them will not be precisely
equal. If one unit has an output approximately one volt greater than the
other, the effect of this will be to electrically disconnect the load
from the lower voltage output engine. This may result in damage to the
stator coil of the engine producing the lower voltage output.
Boston Whaler Factory Installation
Several models of Boston Whaler boats come rigged from
the factory with dual outboards and dual engines.
Below is the wiring which is believed to be
currently used by Boston Whaler in these installations.
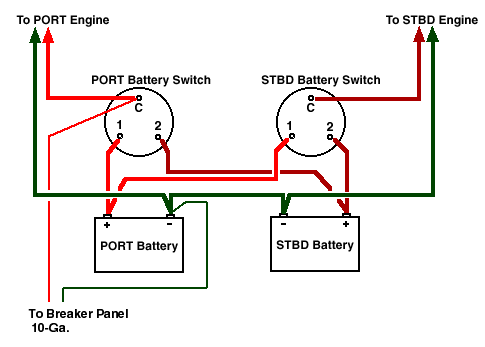 |
Dual Battery/Dual Engine Schematic
NOTE: The starboard battery positive is shown in dark red for clarity; use red wire.
The negative leads are shown in green for clarity; use yellow
wire. All wiring is AWG-2 unless indicated. Switchs are OFF-1-2-BOTH style.
Adapted from a sketch supplied by Boston Whaler by JWH. |
Normal Operating Procedures
The Whaler Factory Installation operating procedure is believed to be:
- Normal operating position of PORT switch is Position 1
- Normal operating position of STBD Switch is Position 2
- To parallel batteries for starting, turn both switches to ALL Position.
Return each switch to its normal operating position after starting.
- PORT engine can be started from STBD battery by turning PORT Switch to Position 2. Return to Position 1 after starting.
- STBD engine can be started from PORT battery by turning STBD Switch to Position 1. Return to Position 2 after starting.
If the suggested procedure is followed, the charging circuits of the two
engines will not be connected together in normal operation. One engine can
charge two batteries, but two engines should not charge a common battery.
Prolonged running of both engines operating on same battery is to be avoided;
prolonged running of both engines with both batteries paralleled is to be avoided.
Alternate Dual Battery Configuration
An alternative approach that is not as flexible but is simpler to
install and operate is shown below.
 |
Dual Battery/Dual Engine Alternative Schematic
NOTE: The starboard battery positive is shown in dark red for clarity; use red wire.
The negative leads are shown in green for clarity; use yellow
wire. All wiring is AWG-2 unless indicated.
All switches are simple On-Off switches.
JWH. |
Normal Operating Procedures
For the alternative dual battery wiring, the operating procedure is:
- For normal operation PORT switch is in On position.
- For normal operation STBD switch is in On position.
- For normal operation TIE switch is in Off position.
- To parallel batteries for starting, turn TIE switch to On position.
Return TIE switch to Off as soon as starting finished.
In some cases, the TIE Switch can be omitted and replaced by a temporary
connection between batteries using a jumper cable. It is probably a good idea
to carry jumper cables in any case. Connecting the two battery negative terminals
is also probably a good idea, even it the TIE switch is not used.
If the suggested procedure is followed, the charging circuits of the two
engines will not be connected together in normal operation. One engine can
charge two batteries, but two engines should not charge a common battery.
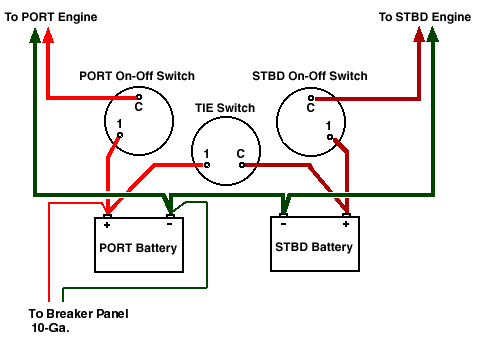
"New" Dual Battery Configuration
A new approach that I just implemented this spring
on my Whaler is shown below. Again, this arrangement is
not as flexible as the "factory" wiring, but it is the most
simple and easiest to install.
 |
Dual Battery/Dual Engine "New" Schematic
NOTE: The battery positive leads are shown in red.
The negative leads are shown in green for clarity;
code suggests the use of yellow wire.
All wiring is AWG-2 unless indicated.
The single switch is an OFF-1-BOTH-2 switch.
JWH. |
Normal Operating Procedures
In the "new" dual battery wiring, the two batteries and
the two engine charging circuits are entirely isolated so long
as the OFF-1-BOTH-2 switch is NOT in the BOTH position.
The switch serves a dual function. In the OFF position
it disconnects the house load from the batteries.
In the 1 or 2 position, the house load is powered from a single
battery as selected. In the BOTH position, the house load is powered from
both batteries, and the two batteries are connected in
parallel. The BOTH position should only be used for special cases,
such as attempting to start an engine and needing additional
battery power.
To prevent the paralleling of the engine charging circuits,
when operating in the BOTH position it is advisable to only
run one engine at a time. The only time the BOTH position
may be needed is in starting an engine whose normal battery is
too weak to crank it over. In that case, the selector can be
moved to the BOTH position, temporarily paralleling the batteries
and allowing the engine (whose battery is weak) to be started.
Once the engine is running, the switch can be moved out of the
BOTH position, and the second engine started from its battery
(which should have enough charge remaining to crank it).
Thus the normal operating procedure is:
- For normal operation, select OFF, 1, or 2 as appropriate
to attach the house load to a selected battery .
- To parallel batteries for starting, turn the switch to the
BOTH position.
Return the switch to OFF as soon as first engine
starting finished. Start second engine. If house load is needed
connect to strongest battery, either 1 or 2
If the suggested procedure is followed, the charging circuits of the two
engines will not be connected together in normal operation. One engine can
charge two batteries, but two engines should not charge a common battery.
Comments About the Three Designs
Whaler Factory
The more complex Whaler factory design allows for more flexibility,
but at the same time allows for the possibility that a wrong setting
of the switches could be made. The result could be damage to the engine charging
circuitry. This arrangement is probably most appropriate on larger,
more complex vessels
Alternate
The principal advantage of the "alternate" wiring shown is its simplicity.
If the TIE switch is not thrown, there is no chance to connect two engine
charging circuits together. Sometimes in situations of high stress, like
a hard starting engine in a rough sea, simplicity has very desirable advantages.
Notice that the alternate arrangement connects the circuit breaker panel to
only the Starboard battery. This prevents the Port battery from being discharged
by other loads (like lamps left on or a stuck bilge pump switch), thus
preserving it for starting duty only. This can be an important advantage.
New
The principal advantage of the "new" wiring is its extreme simplicity.
Only one switch is used and it serves a dual purpose.
The batteries and charging systems are kept isolated except when the BOTH
position is selected for special or emergency starting conditions.
The disadvantage of this arrangement is there is no electrical disconnect
of the batteries from the engines. However, there are millions of outboard
powered boats that operate without such a disconnect, save for the
case of opening the battery box and removing the leads from the terminals.
The only need for such a disconnect would be in the unusual case of the engine
electrical circuit malfunctioning, as could occur with trim relay,
starter motor contactor, or other electrical load remaining stuck in an
"ON" condition.
UPDATE: I wrote this article over 20-years ago, and I no longer endorse the "New" wiring for the battery switch that I describe above. At the time it was an expedient method to cure another problem associated with having two engines connected to one battery simultaneously.
Other Wiring Arrangements
A great deal of other possible wiring and connection of batteries,
loads, switches, starters, chargers, and engines is possible.
In many cases, additional equipment like isolators and separate
chargers are added. Some engine alternators have specialized regulator
circuits which permit separate sensing leads to be connected to the
battery to compensate for other voltage drops in the circuit.
In the main, none of this is applicable to outboard powered boats for two
very simple reasons. First, the starter motor and alternator are usually
connected together under the cowling of the outboard motor and are not
easily separated without significant electrical modification of the
outboard. Second, even if one were to re-wire their outboard motor,
it would be necessary to add a great deal of external wiring coming
from the motor to the various external components (like the isolators,
the switches, the chargers, etc.). All this wiring would have to be
made flexible and be capable of withstanding the turning and tilting
inherent in the operation of an outboard motor.
In many years of boating, I have never heard of or seen anyone having undertaken the modification of an outboard engine electrical under-cowling wiring to interconnect isolators, switches, and other external circuit components. If I did encounter such an outboard, I would be extremely wary of it. I doubt that typical owners, do-it-yourself-er, or factory trained mechanics would be comfortable working on such a modified engine. In short, I do not endorse making that type of modification.
Caution Advised
Wiring of low-voltage/high-current circuits can be hazardous because of the extremely high short circuit current capacity that exists when working with large batteries. All the information provided is believed to be accurate and representative of techniques and practices in common use in the marine applications described. Examine any wiring carefully for proper configuration before applying power. Low-voltage/high-current short circuits can produce extremely rapid heating and can be dangerous. Never wear a ring or metal jewelry when working with high-current sources like storage batteries.
Comments or Questions
If you have a comment or question about this article, please post it in
the Whaler Forum.
DISCLAIMER: This information is believed to be accurate but there is no
guarantee. We do our best!
The page has been accessed times.
Copyright © 1999, 2000 by James W. Hebert. Unauthorized reproduction prohibited!
This is a verified HTML 4.0 document served to you from continuousWave
URI: http://continuouswave.com
Last modified:
Author: James W. Hebert
This article first appeared February 10, 2001. A revised version appeared February 14, 2001