OUTRAGE 25 Hull Fractures
Posted: Mon Nov 07, 2016 12:35 pm
As I recall, on the Boston Whaler OUTRAGE 25 boats there was sometimes a problem with the integrity of the hull on the port side of the boat, at the point where the fuel filler hose and fuel tank vent hose pass through. There was some reporting of the hull cracking at this point, perhaps due to some really strong forces encountered in taking on head seas. I have no first hand experience with this, but I have read of it, and had heard it mentioned by people I consider reliable sources.
This topic has been brought up before (in the old forum). The existence of even the possibility that this could occur was debated, but there were anecdotal reports of seeing this happen. Get a little more background at
http://continuouswave.com/ubb/Forum3/HTML/002574.html
http://continuouswave.com/ubb/Forum3/HTML/016044.html
http://continuouswave.com/ubb/Forum1/HTML/008680.html
Also, I found this interesting comment recently posted on TheHullTruth in a thread seeking advice on buying a used OUTRAGE 25:
Source: Tom Clark at http://www.thehulltruth.com/9622898-post8.html
I came across some images that perhaps show the problem area. I thought this would be an interesting topic for discussion because, as far as I can recall, the area that cracks and what is causing this has not been illustrated before.
The weakening of the hull structure seems to be a thinning of the hull sides in the area where the fuel lines are carried upward. This can be seen in these views (which were recently posted and linked-to in another thread, but here I have reduced the images a bit to make them fit in-line):
See original at http://i1205.photobucket.com/albums/bb434/russellbailey3/Radar%20Arch/2013-05-31145706_zps6ec577f7.jpg
See original at http://i1205.photobucket.com/albums/bb434/russellbailey3/Radar%20Arch/2013-05-30133149_zps65378c60.jpg
I certainly do not mean to suggest there is any problem with the boat shown, I just wanted to use the images to illustrate the hull configuration at the point where the problem has been suggested to occur and to verify if this spot is, indeed, the site and the cause of the problem. Any informed comments or opinions are welcome.
Here is a transcription of the instructions sent out by Boston Whaler for repair of these cracks (which were posted several years ago, and for convenience I repeat here below):
FRACTURED TOPSIDES REPAIR
USE STEPS 1-4 ON INSIDE, OUTSIDE AND TOP OF gunwale:
1. Cut away fractured glass 1/2" on either side of the crack to form a 1" wide opening.
2. Taper grind original skin out 6" from the crack as shown, and dig out foam from about 1" behind glass.
3. Stuff areas behind glass and cut-out area with resin and chopped fiber mash until full.
4. Mat over area with multiple layers of 2 oz. mat until back to original thickness. After mat is cured, grind it flat and flush with original skin. Use a straightedge to check.
USE STEPS 5-7 ON EXTERIOR TOPSIDES:
5. Rough up topsides to 60" of either side of already repaired area.
6. Cover entire topsides from under gunwale to chine, with 4 layers of COFAB 10 oz. uni-axial material 96" long. Each layer should be staggered 6", and the first layer should start 57" aft of crack. Fair each end by sanding and filling with resin paste to blend with side and show no bump (See drawing next page).
NOTE: It may be necessary to put screws in hull to hang the COFAB to prevent sagging and sliding.
7. Cover entire area with one layer of 2 oz. mat 9' long; fair each end to blend with the side.
8. Finish both inside and outside repairs with gelcoat.
[Dated] 0598-6
This topic has been brought up before (in the old forum). The existence of even the possibility that this could occur was debated, but there were anecdotal reports of seeing this happen. Get a little more background at
http://continuouswave.com/ubb/Forum3/HTML/002574.html
http://continuouswave.com/ubb/Forum3/HTML/016044.html
http://continuouswave.com/ubb/Forum1/HTML/008680.html
Also, I found this interesting comment recently posted on TheHullTruth in a thread seeking advice on buying a used OUTRAGE 25:
...the biggest liability with the 25 foot hulls is the crack that can sometimes develop at the fuel tank vent on the port topsides. It happens most often on Outrages used hard in big water....
Source: Tom Clark at http://www.thehulltruth.com/9622898-post8.html
I came across some images that perhaps show the problem area. I thought this would be an interesting topic for discussion because, as far as I can recall, the area that cracks and what is causing this has not been illustrated before.
The weakening of the hull structure seems to be a thinning of the hull sides in the area where the fuel lines are carried upward. This can be seen in these views (which were recently posted and linked-to in another thread, but here I have reduced the images a bit to make them fit in-line):
- Outrage25HullSideStarboard.jpg (29.58 KiB) Viewed 7192 times
See original at http://i1205.photobucket.com/albums/bb434/russellbailey3/Radar%20Arch/2013-05-31145706_zps6ec577f7.jpg
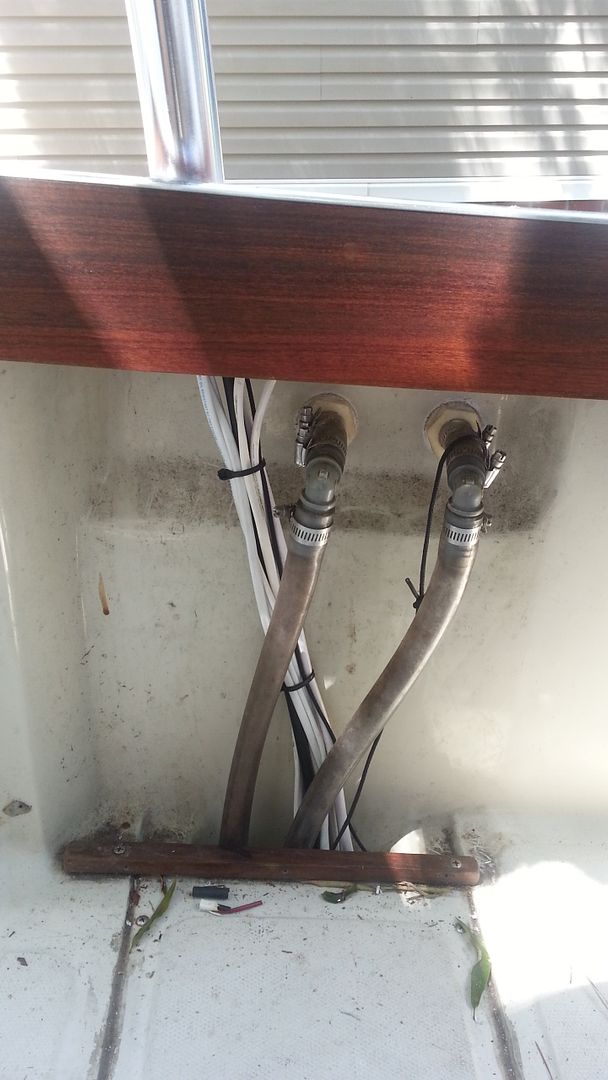
- Outrage25HullPort.jpg (27.03 KiB) Viewed 7192 times
See original at http://i1205.photobucket.com/albums/bb434/russellbailey3/Radar%20Arch/2013-05-30133149_zps65378c60.jpg
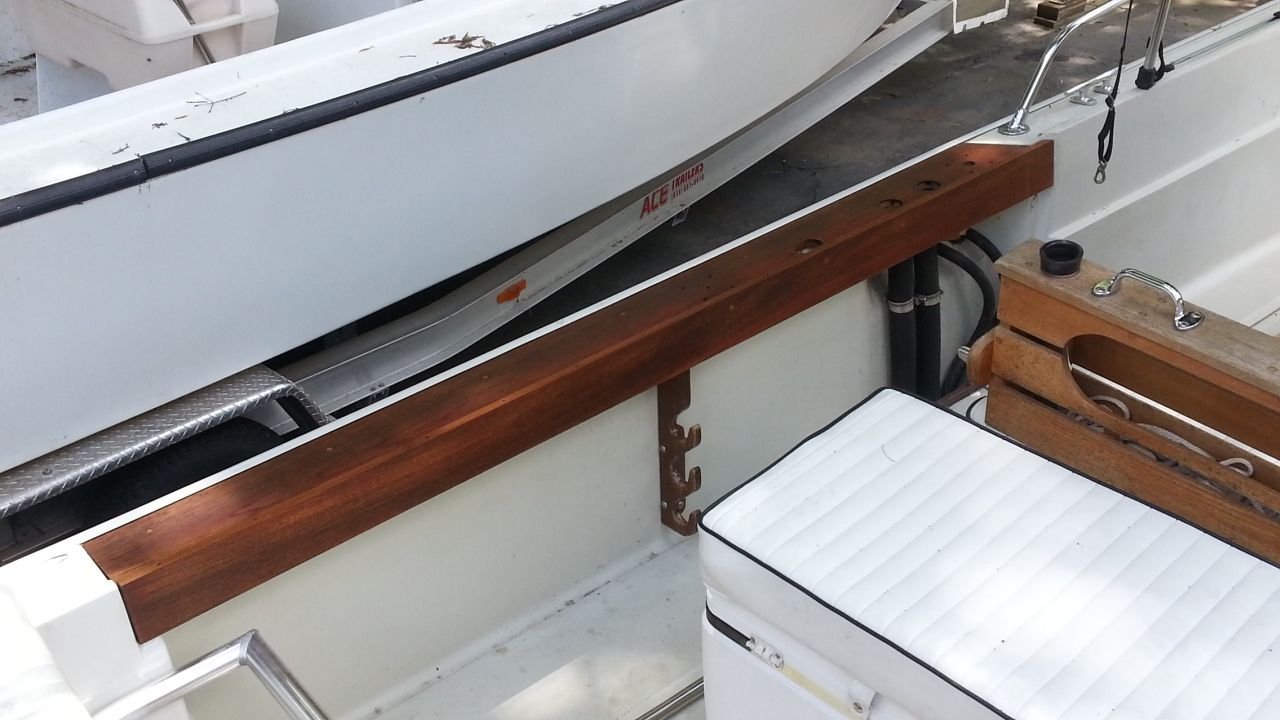
I certainly do not mean to suggest there is any problem with the boat shown, I just wanted to use the images to illustrate the hull configuration at the point where the problem has been suggested to occur and to verify if this spot is, indeed, the site and the cause of the problem. Any informed comments or opinions are welcome.
Here is a transcription of the instructions sent out by Boston Whaler for repair of these cracks (which were posted several years ago, and for convenience I repeat here below):
FRACTURED TOPSIDES REPAIR
USE STEPS 1-4 ON INSIDE, OUTSIDE AND TOP OF gunwale:
1. Cut away fractured glass 1/2" on either side of the crack to form a 1" wide opening.
2. Taper grind original skin out 6" from the crack as shown, and dig out foam from about 1" behind glass.
3. Stuff areas behind glass and cut-out area with resin and chopped fiber mash until full.
4. Mat over area with multiple layers of 2 oz. mat until back to original thickness. After mat is cured, grind it flat and flush with original skin. Use a straightedge to check.
USE STEPS 5-7 ON EXTERIOR TOPSIDES:
5. Rough up topsides to 60" of either side of already repaired area.
6. Cover entire topsides from under gunwale to chine, with 4 layers of COFAB 10 oz. uni-axial material 96" long. Each layer should be staggered 6", and the first layer should start 57" aft of crack. Fair each end by sanding and filling with resin paste to blend with side and show no bump (See drawing next page).
NOTE: It may be necessary to put screws in hull to hang the COFAB to prevent sagging and sliding.
7. Cover entire area with one layer of 2 oz. mat 9' long; fair each end to blend with the side.
8. Finish both inside and outside repairs with gelcoat.
[Dated] 0598-6