search | FAQ |
profile | register | author help
|
|
|
| Author | Topic: HDS-8 Installation |
| jimh |
 posted 08-15-2010 09:15 AM ET (US)
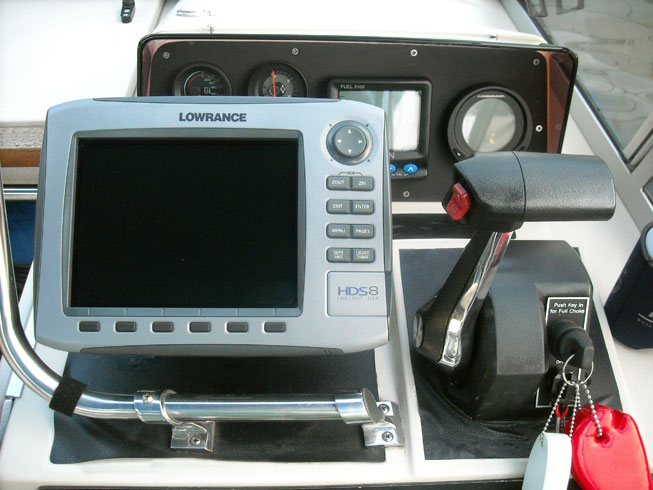
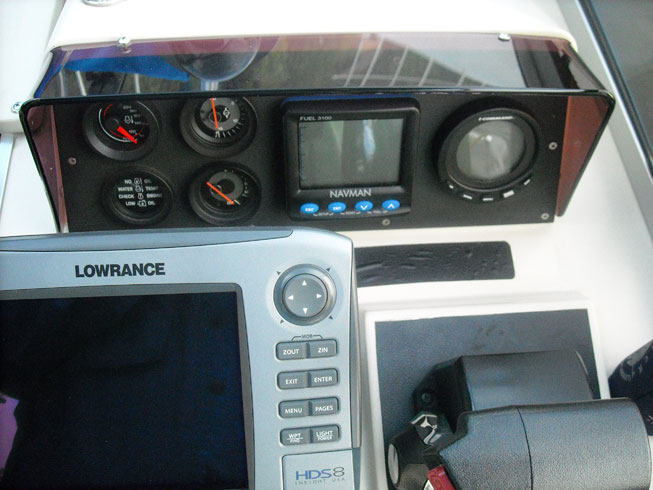
 I just purchased (from LOCKEMAN'S HARDWARE and BOAT) a LOWRANCE HDS-8 combination GPS receiver, chart plotter, SONAR, and multi-function display with 83 and 200-kHz transom mount transducer and Lowrance INSIGHT USA cartography option. The decision to get the Lowrance HDS-8 was based on the following criteria: --NMEA-2000 compatible The Lowrance HDS-8 met the requirements, and, due to the close relationship between Evinrude and Lowrance--Lowrance is the OEM of the Evinrude line of I-Command gauges--I was certain there would be no problems with compatibility between my Evinrude E-TEC engine and the Lowrance NMEA-2000 interface and multi-function display. After installing the HDS-8 and using it for several days, I offer the following observations. Installation On the rear of the HDS are four connections: POWER-DATA, SONAR TRANSDUCER, NMEA-2000 NETWORK, and ETHERNET. The POWER-DATA cable is supplied with a connector and two three-foot cables that terminate in pigtails, one for power and one for NMEA-0183 serial data connections. These were suitably long enough to connect easily to my existing power distribution center and my serial data terminal block. Since I do not have another Lowrance device with Ethernet connectivity, I applied the included vinyl boot to the ETHERNET connector as a weather seal. The transducer installation on the transom was very simple. I removed the existing Lowrance transducer that I had been using from its mounting bracket, and installed the new one in its place. The transducer mounting arrangement is the same, and I just left the existing stainless steel bracket in place. Running the transducer cable was a bit more complicated. The hole in the helm console the transducer cable has to pass through is just large enough for its connector. This means this cable has to be run through the hole first, then any other cables (whose connectors are smaller or that have just bare wires) can be added later. The connector was also a tight fit through the rigging tube that passes through the transom to the engine bracket. I pulled the old transducer cable out with a temporary pull wire attached to it, then used the temporary wire to pull in the new cable. Unfortunately the new transducer cable was about two feet shorter than the old cable--which was just exactly long enough to reach. This left the new cable about two feet short. Fortunately, I had on-hand a Lowrance transducer extension cable whose connectors seemed to be compatible with the new cable, although they were different in color. With the extension in place, the new transducer was connected. I don't know if the difference in length of the two cables was intentional or just a bit of production variation. My boat has a NMEA-2000 network, so I was eager to add the HDS-8 to the backbone wiring. That is when I realized that in the standard accessories provided in the HDS-8 box there was no DeviceNET drop cable or DeviceNET backbone T-connector. Since the HDS-8 can be used as a stand-alone device, without any NMEA-2000 connection, those accessories are not included. I had to make a fast run to LOCKEMAN'S to get a drop cable and network-tee. I spent a few minutes orienting the HDS-8 in its mounting bracket on the helm console to find the best mounting, working around the existing large hole for cables as I did not want to make another new one. The console has seen a number of different devices mounted on it, and there are already quite a collection of cable access holes and bracket mounting fastener holes. The HDS-8 replaced separate GPS-Chart plotter and SONAR devices, each with smaller screens of about four-inches diagonal. I have not added up the screen pixels, but on a rough estimate I would say that the HDS-8 does not have a huge increase in screen space compared to the combined screens of two separate devices. However, the HDS-8 screen is in 8-bit color while the older devices were very limited 1-bit monochrome screens. The color presentation is very effective in both chart plotting and SONAR applications. When the whole screen is used for one function the display is very generous, 800 x by 600 pixels, and even when split for two functions simultaneously, the 400 x 600 pixel screens for each function are very easily seen and interpreted.
Interconnections Connecting the Lowrance HDS-8 to other devices in my vessel was straightforward, but perhaps a bit more complex than the typical boater might anticipate. There are three types of connections: power, serial data, and network. For power Lowrance supplies a POWER-DATA connector and cable with about three feet of unterminated wiring. It was simple to connect the red and black power conductors to the secondary power distribution terminal under my helm station. The serial data connection are provided on a separate cable with four wires and a shield conductor. The configuration of the wires is controlled in software, and they can be set up to be RS-422 serial data with one differential input and one differential output port, or as RS-232 serial data with two input and two output ports operating single-ended against a common ground. The default setting is for RS-422 and one input and one output. Using the Lowrance HDS-8 settings menu I changed the configuration of the serial ports to RS-232. I terminated the data wires onto a small terminal block under the helm station. For the serial data connections, I interfaced the two output ports from the HDS-8 to two devices: one to a Standard-Horizon radio, and the second to my NAVMAN 3100 fuel instrument. For the inputs to the HDS-8, only one was used, and it was wired to the Standard Horizon radio data output. In the default configuration there is no data selected to be sent on the serial port outputs, so the user must configure this in the Lowrance settings. I selected the NMEA sentence GGA to be sent. The serial data connection port speeds also have to be configured. I left them set at the default setting, 4,800-BPS. Network connections are available in two forms: the standard NMEA-2000 network interface, and a proprietary Lowrance network carried on Ethernet wiring. At the moment I have no other Lowrance devices so the Lowrance network connector was not used. I do have a vessel NMEA-2000 network, and I added the HDS-8 to it using a standard DeviceNET drop cable and network T-connector. This completed the physical interconnection of the HDS-8. To check on the interoperation, I turned on the HDS-8 and my VHF Marine Band radio. The radio soon displayed a satellite icon on its front panel, indicating it was receiving GPS-based vessel position information. This verified the connection from the HDS-8 to the radio. However, the NAVMAN 3100 fuel instrument was not happy. It was not displaying information about vessel speed, an indication that the serial interface was not exchanging the data needed by the fuel instrument. By the time I discovered this I had buttoned-up all the wiring and was not eager to make any changes. As it happens, the fuel instrument wants to see the NMEA sentence RMC, so all I had to do to enable this interface was to change the software setting on the HDS-8. Once I set the HDS-8 to send RMC on its serial ports, the fuel instrument started working. This problem demonstrates the complexity of serial data interfacing. There are many layers. The physical interconnection of the wires (that is, what wire connects to what other wire), the configuration of the format of the serial data (such as speed, parity, and stop bits), and then the configuration of what data is actually being sent (that is, what NMEA sentences or data format is used) all must be done correctly to get a connection working. This often proves to be beyond the skill set of boaters who are not electronic or network geeks. The MNEA-2000 network is more or less self-configuring, and as soon as the HDS-8 was powered on it found all the other devices on the network without a problem. At the moment the NMEA-2000 network on my vessel is rather simple, and it consists of an Evinrude E-TEC outboard, two Evinrude I-Command gauges, an Evinrude fuel memory module, and the HDS-8. It is not a secret that the OEM for the Evinrude I-Command components is Lowrance, so there was not any difficulty in discovering and communicating with those devices. With only a single engine on the network, the HDS-8 engine information pages were all preconfigured to work, and without any user intervention at all I began to see engine data on the INFORMATION screens of the HDS-8. |
| jimh |
posted 08-15-2010 09:49 AM ET (US)
Operation I cannot say much about operating the HDS-8. I am still learning how to use it. I suspect I will be saying that a year from now, as the device has many capabilities, and becoming familiar with and taking advantage of all of them will take some time. One feature that I have already learned to use it the screen capture. The HDS-8 can capture its screen and stores it internally using its own memory. Later you can use a file management utility to transfer stored images from the HDS-8 internal memory to a SD memory card. The SD memory card can then be moved to another computer and the images recovered from it. Here is a sample, a look at the bottom contour of Tecumseh Cove as we slowly motored over a wreck site:
The color of the echo is correlated with its strength. You can see the nice strong return echo from the hull of this wreck 50-feet below. |
| Jefecinco |
posted 08-15-2010 10:35 AM ET (US)
Jim, Very nice. That screen shot shows a nice number of fish hanging around the wreck. Now that you have a good fish finder you'll have to try your luck. Butch |
| alfred |
posted 08-15-2010 11:29 AM ET (US)
Thanks for putting this up, [the HDS-8] is one of the units that I am considering installing in my boat. [Mentioned another device he was considering, as well]. Please post up after you get to use it a bit. I would like to know what you think of it, how it actually performs and the ease of use. Cheers! |
| jimh |
posted 08-15-2010 01:11 PM ET (US)
The HDS series from Lowrance is a new generation of devices. Recall that Lowrance was purchased by NAVICO, a marine electronics conglomerate. The name NAVICO was not particularly familiar to most boaters because the company did not and does not promote the NAVICO name as a brand onto itself but instead concentrates on its product brands. In addition to Lowrance, the conglomerate also includes: --SIMRAD I am sure those names are all familiar to most boaters. I have listed them in inverse alphabetic order, but, curiously, that order seems to be about the rank order in terms of the price range of units. Lowrance comes in the list somewhere below Northstar in terms of price for units of similar size display. The operating system that runs the HDS-8 and other HDS-series devices is substantially different from prior Lowrance products, and it is based on the NAVICO OPERATING SYSTEM. The Navico Operating System (or NOS) is apparently intended to be the underlying basis for many products in the Navico family of brands, and will probably appear in other new products as they are introduced. The underlying environment of the NOS appears to be unix-based, likely embedded Linux. One source has said that the QT development system is used. http://qt.nokia.com/products/platform/qt-for-embedded-linux On initial impression the HDS-8 operating system seems fast and straightforward to use. There are a few quirks in some menus in the way they work, and I suspect this might be a case of some legacy Lowrance techniques still being employed. It is noteworthy that Lowrance has already released one or two major updates to the software. The notion that your marine electronic device will now be able to be improved and upgraded is quite different from the norms of just a few years ago. Before, when you bought a device you were done as far as upgrading the way it works. With a modern device built on a modern operating system, it appears it will become the norm to apply updates or patches from time to time to enhance operation. From my perspective the elements of the device are: --the color display The color display is very bright and is easily seen in sunlight conditions. I was running the display without pushing the intensity up to the maximum level, and it was still nicely visible. The GPS receiver boots rapidly and every time I checked its status showed a solid fix with WAAS precision augmentation. The chart plotter seems easy to use. I haven't had to read the book on it yet, and I figured out how to add waypoints, rename them, navigate to them, and so on, just from punching a few buttons. The cartography is quite good, but I would suggest that for your home waters you will probably want to purchase even better electronic charts. While the built-in package is very nice and shows an amazing amount of information for the entire United States, it is not as detailed as the optional Navionics regional charts. The SONAR seems quite good to me. It is a digital broadband SONAR. Previously we had some discussions about what a "digital SONAR" might be, exactly. I expect that anyone who had a Lowrance SONAR before will be very happy with the HDS-8 SONAR. With the HDS-8 there are many options for using the display for purposes other than chart display or echo sounding, and external devices such as a RADAR or your engine can make use of the display. |
| jimh |
posted 08-15-2010 01:35 PM ET (US)
An additional note re the difference between the HDS-8 and HDS-10: the principal difference appears to be in the size of the display. The pixel resolution is the same for both, 800-H x 600-V. Both devices will have the same number of pixels on their screen, but in the HDS-10 the pixels will be bigger, and the overall screen larger, of course. The HDS-8 and HDS-10 are somewhat distinct from the smaller units in the arrangement of the serial ports. The HDS-8 and HDS-10 can reconfigure the serial ports for more flexible interface to other devices. I suspect--but don't know for a fact--that the processor speeds might be faster in the HDS-8 and HDS-10 than in the smaller units. Between the -8 and -10 models, I do not see any difference in the specifications except for the size of the display. Compare at: http://www.lowrance.com/ProductComparisonPopup/ ?productIds=33487,33478,33481,33484 |
| jimh |
posted 08-15-2010 04:12 PM ET (US)
For more about NAVICO and the various brands, I recommend this excellent article from POWER & MOTORYACHT magazine by Tim Bartlett: http://www.powerandmotoryacht.com/electronics/whats_a_navico/ An interesting comment in the article is made by Louis Chemi, Navico's executive vice-president and chief operating officer for the Americas. He hints that the brand differentiation may eventually be reduced to just three, with Simrad, Lowrance, and B&G remaining. He also talks about the design of the user interface on various brands to fit best with the typical customer. For Lowrance the typical user is described as an inland or near coastal boater, with emphasis on fishing as opposed to navigation features for passage making. |
| SJUAE |
posted 08-15-2010 04:33 PM ET (US)
One of the best things is the data overlays so you can add important data to your screens ie when looking just at chart screen depth or engine info can be added Lowrance do a nice little tutorial video to show this on their support site http://www.lowrance.com/Support/Video-Library/MARINE/How-Tos/ LL-HDS-Data-Overlay/ Regards |
| jimh |
posted 08-17-2010 08:25 PM ET (US)
From the LEI -Extras website, 2012 UPDATE: The LEI-Extras website has been replaced by STORE.NAVICO.COM I ordered several accessories for my HDS-8 device. I don't plan to leave the HDS-8 sitting on the boat all winter while it is in storage, so I bought an extra DC power cord and data cord. I also bought a second gimbal mounting bracket, so I could install the HDS-8 on my bench. I used the LEI-Extras website to place the order. The process was very straightforward, and I just received the power cord and gimbal bracket today. Many local sellers of Lowrance don't have accessories like this in stock, and their Lowrance distributors do not have them available either. Ordering from the LEI-Extras website was very convenient. |
| jimh |
posted 08-18-2010 06:27 AM ET (US)
Steve--I like your revised graph showing screen display size. It shows that the inclusion in the HDS-8 and HDS-10 of the on-screen legends for the buttons below does steal a noticeable portion of the added screen display space provided by the HDS-8 compared to the HDS-7 which lacks those buttons. |
| jimh |
posted 08-22-2010 04:25 PM ET (US)
As I mentioned, I got an extra power cord set for the HDS-8, along with an extra gimbal mounting bracket, and I have set up the device on my bench. I did this to permit me to use it when not aboard the boat, initially as a way of learning how the device worked, as well as to have the device available for simpler transfer of data in and out of its memory. Without much trouble or learning, I figured out how to export my GPS track data from my recent cruise in Georgian Bay. When exporting track data, there are options for four different formats. I choose the GPX or GPS Exchange format, because I figured it would be the most universal. In a few clicks of the NAVICO Operating System, I exported my GPS trail file to a SD Memory card. I moved the memory card to my MacBook Pro laptop, which has a memory card reader installed in its Express 34 PCMCIA slot. From there I moved the file, all 2.8-Megabytes and 10,000 track points, over to my MacOS machine. There were a lot of extraneous track points in the file, including what appeared to be some data local to Tulsa, Oklahoma, where Lowrance is located. I looked around for a GPX data editor, but eventually I just opened the file with a powerful text editor I have, BBEDIT. The GPX file was in an XML format, and the BBEDIT application had no problem formatting the file and presenting it with its usually wonderful presentation where tags and other mark-up text are differentiated from data text by color coding. The XML data format for GPX files is very straightforward, and it only took a few moment to figure out how to edit the file. I found it easy to discard extraneous track points which were cluttering the file. These were mainly points where the original track file contained a lot of data points collected when the boat was sitting at the house prior to the trip and the HDS-8 was switched on. After a bit of editing, I began to break the total trip track file into segments, one for each day. From there, I imported the edited GPX files into GOOGLE EARTH. This permitted a very nice presentation of the trip. Each track point is shown individually, and if you zoom into a track point you can click on it to get further data such as speed and heading. It was quite fun to review the trip, check the boat speed at various places in the journey, and see exactly when and where we went. Later I will post a GOOGLE EARTH "My Places" file that shows some of the trip, and if you like you can get a precise track of our recent boating trip. The GPX track file export feature in the HDS-8 is a great and somewhat unexpected bonus. It has already given me several hours of fun playing with it, and I am not even on the boat! |
| SJUAE |
posted 08-22-2010 05:18 PM ET (US)
Jim The screen used up by the on screen legends for the button is worth it when underway not having to scroll through menus makes it simple on the HDS-8 & 10 I forgot about LEI-Extras website I stumbled across it during my researching. They also have a nice ram mount that would be an ideal attachment method if like me you have a high dash and a gimbal mount would obscure your vision As we thought in the previous discussion on google earth the track file should be easy to edit, glad you proved this, look forward to seeing your results Can I suggest you save some of these projects for your winter months, Regards |
| jmorgan40 |
posted 08-24-2010 10:40 AM ET (US)
Jim, Thanks for the information. As always a very detailed update. One question I have is regarding your Navman. Are you considering eliminating it. Can't you now display fuel flow on the iCommand guage and / or the new HDS8? |
| jimh |
posted 08-24-2010 11:51 AM ET (US)
The HDS-8 includes a trip log function. There are three logs available: --TRIP 1 The trip log function is enhanced somewhat by the ability to set a parameter for a threshold level of boat speed which must be obtained to increment the trip log accumulator. For example, if you were to anchor for two hours and the boat were swinging at anchor, the GPS might calculate that the boat was continuously moving at a low rate of speed, perhaps 0.2-MPH. If you wish to ignore this sort of movement in the accumulated TRIP LOG, you can set a speed threshold at a higher value, say 1.0-MPH. This would cause the TRIP LOG to ignore the distances the boat moved when its speed was below 1-MPH, and the movement of the boat when swinging at anchor would tend to be ignored. The TRIP 1 and TRIP 2 distance log accumulators can be enabled separated and reset separately, permitting flexibility in their use. For example, you could leave TRIP 1 always enabled, creating a seasonal or historical distance accumulator. For distance accumulation over shorter duration, you could then use TRIP 2, resetting it and enabling it for each trip or segment. The TODAY offers a third option. I have not learned its precise characteristics; I will have to do some more reading and learning. For the moment, I am leaving the NAVMAN installed and operating for two reasons: --I am still using its LOG function while I learn to use the HDS-8 logs, and --the hole in my instrument panel for the NAVMAN is 51-mm. The required hole diameter for a replacement LMF-400 is about 3-1/8-inch, or 80-mm. Even the smaller LMF-200 gauge is 54-mm in diameter, so it will not fit in the existing hole in my dash panel. Thus, at the moment, the NAVMAN F3100 is acting as a hole filler and doing a fine job as the LOG accumulator. But that will change when I get a chance to tear out the instrument panel, remove everything, and cut a larger hole. Isn't boating always a process of continual perfecting of the boat? |
| jimh |
posted 09-06-2010 06:55 PM ET (US)
Recently I had a chance to operate the HDS-8 SONAR in some deep water. While running on plane in the cold fresh water of Lake Superior, I was getting good bottom echoes from 700-feet with the 200-kHz transducer. This was quite impressive. My older 200-kHz SONAR was typically done with finding the bottom once in water more than 200-feet deep. |
| jimh |
posted 09-08-2010 08:35 AM ET (US)
Below is a screen capture of some echoes we obtained while motoring in a remote cove on the north side of Isle Royale. I am not much of a fisherman, but these look like returns from rather large fish. Perhaps someone with experience with the HDS series and fishing can comment:
|
| SJUAE |
posted 09-08-2010 03:01 PM ET (US)
Jim Certainly looks like classic fish arches, best way to confirm is to drown a few worms and catch one :) BTW you have frequency set on 83khz probably from your earlier deep water excursion 200khz is more suited to shallower water but the HDS,s seem to do a good job regardless. Regards |
| jimh |
posted 09-08-2010 06:31 PM ET (US)
Steve--Actually you cannot use any sort of live bait in those waters, a precaution to keep out non-native species. If I get back that way I will get a fishing license, bring some tackle, and see what is down there. I suspect large Northern Pike. Yes, I had the frequency set to 83-kHz as we had been out in water with depths to 600-feet, and I neglected to switch back to 200-kHz mode. There is probably more detail available with the higher frequency. I see that on the LOWRANCE down-scan models coming out soon the transducer will be operating at much higher frequencies for more detail, and they'll be using 455-kHz and 800-kHz for the SONAR. We may have to add one of those units, too. A fellow can't have too many SONAR units, can he? |
| SJUAE |
posted 09-09-2010 10:49 AM ET (US)
Jim Slight confession I got the structure scan already :) but I have yet to see anything of real interest worth posting My sonar returns are never as nice as your fish arches and I get these strange huge blobs that should be bait balls but the structure scan/ downscan tells me otherwise which is why I got it to help interpret the sonar display I love add ons and NMEA2k makes it easier now. I was looking forward to adding broadband radar but as the Mrs made me buy a holiday home so this is delayed but maybe a weather station could be fun with wind speed temp humidity etc and I still have my AIS duplexer to get for interfacing with the SH GX2100 VHF Good job my boating season is 12 months I need this time for practice :) Regards
|
| jimh |
posted 09-09-2010 09:16 PM ET (US)
I just applied the new HDS v3.5 release patch or upgrade. I accomplished the creation of the SD card entirely in the MacOS environment, and the update executed without a problem. [I mention this because previously the creation of the SD card containing the v3.0 patch was not successful in the MacOS environment and I had to make the SD card in a Windows-OS environment.--jimh] (Thanks to Dave Hart for the email notice of the upgrade being posted.) You can get the upgrade patch from Details of what is in the upgrade are available from http://www.lowrance.com/upload/Lowrance/Documents/Software_Updates/ HDS_3_5_RELEASE_NOTES.pdf This upgrade is not as comprehensive as the v3.0 patch released earlier. |
| Plotman |
posted 09-16-2010 12:19 AM ET (US)
Jim- I have caught very big Lake Trout as well as lunker northerns up there. Every time I read more about this trip, I feel even worse for missing it. |
| jimh |
posted 09-20-2010 09:13 PM ET (US)
An email correspondent wrote to me to ask about the TRIP CALCULATORS on the HDS-8. Their location is a bit hidden. You can access the TRIP CALCULATORS as follows: --press the PAGES button Discovery of the TRIP CALCULATOR functions was the last feature needed to convince me to get the HDS-8. The TRIP CALCULATOR was an essential component for me. I needed a simple way to track the distance travelled on the boat. Once I found the TRIP CALCULATOR function, I was sold. |
| jimh |
posted 09-22-2010 09:47 AM ET (US)
A bit more on the TRIP CALCULATOR functions on the Lowrance HDS-8: There are three trip calculators or distance accumulators. They take their input from the GPS position and speed data, not from an electronic sensor like a paddle-wheel log. TRIP1 and TRIP2 can be enabled or disabled independently. When enabled, the trip calculator begins accumulating distance. This permits the user to employ the two trip calculators as desired. For example, TRIP1 could be left enable at all times, and would accumulate the total distance travelled during any time the unit was switched on. This could be useful to accumulating distance travelled over a season or over several seasons. TRIP2 could be reset for each individual trip, providing current trip information without having to do any addition or subtraction from the seasonal totals. The third trip caculator, TODAY, appears to reset itself daily. A further enhancement is a sensitivity threshold for speed. By setting the threshold for speed of movement, you can prevent the trip calculators from accumulating distance when the boat is really not moving but due to GPS errors appears to move very slowly around a fixed position. This produces a more accurate distance figure. |
| alfred |
posted 09-28-2010 09:59 AM ET (US)
Jim - Could you please tell me what type of connector is the transducer using? How many pins and the colour. Weird question I know, but Lowrance has changes connectors several times. I am thinking of getting a HDS8, but would like to know if it will connect to my 1kw Furuno/Airmar transducer. |
| jimh |
posted 09-28-2010 11:00 AM ET (US)
The HDS-8 has a blue connector for the transducer. The pin arrangement seems to be the same as the gray connector they were using a few years earlier. I do not have the pin out details; also, I don't have the pin count handy. I will look at mine later today. |
| SJUAE |
posted 10-10-2010 10:48 AM ET (US)
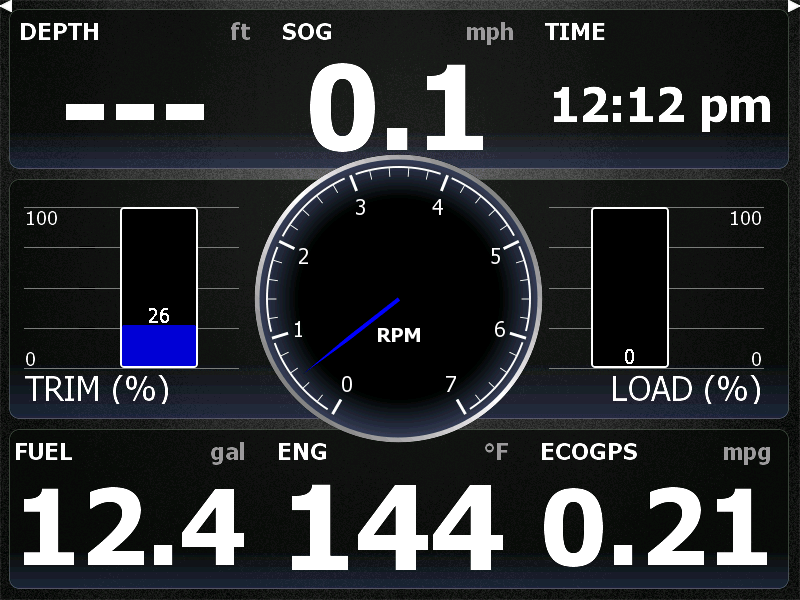
As I mentioned in the beginning of this discussion, a principal criterion in purchasing a new instrument was NMEA-2000 network compatibility. The HDS-8 is able to obtain data from my E-TEC engine's NMEA-2000 interface. There is a INFO page available which permits display of all sorts of data from connected NMEA-2000 devices. There is a page editor which allows customization of the display. Below is a screen capture (also a requirement for me) of the INFO page I have been using.
The E-TEC engine contributes: --engine speed The memory module contributes: --remaining fuel in fuel tank The HDS-8 contributes: --time of day |
| jimh |
posted 10-10-2010 01:53 PM ET (US)
A note about the two parameters, TRIM and LOAD The TRIM setting is shown as a percentage of the trim range. With the E-TEC engine this setting is calibrated using the Evinrude Diagnostic software. When the engine is at its lowest setting, which varies according to the location of the trim limit rod on the mounting bracket, the TRIM is calibrated to shows "0". When the engine is tilted to the upper range of trim, the TRIM reading is calibrated to show "99". This gives a very fine resolution to the TRIM position settings. Previously when a conventional trim gauges was used, this same range of engine position only occupied less than one-third of the trim gauge dial display. The engine trim position indicated via NMEA-2000 (after calibration) has much better resolution. The LOAD setting is shown as a percentage of the throttle plate position. In this case, the engine was at idle and minimum throttle, so the LOAD setting is "0." At maximum throttle the LOAD setting is approximately "99." (The actual maximum varies slightly with individual throttle cable rigging and throttle position sensor readings. In my case full throttle is about "96" indicated.) |
| jimh |
posted 03-27-2011 10:17 AM ET (US)
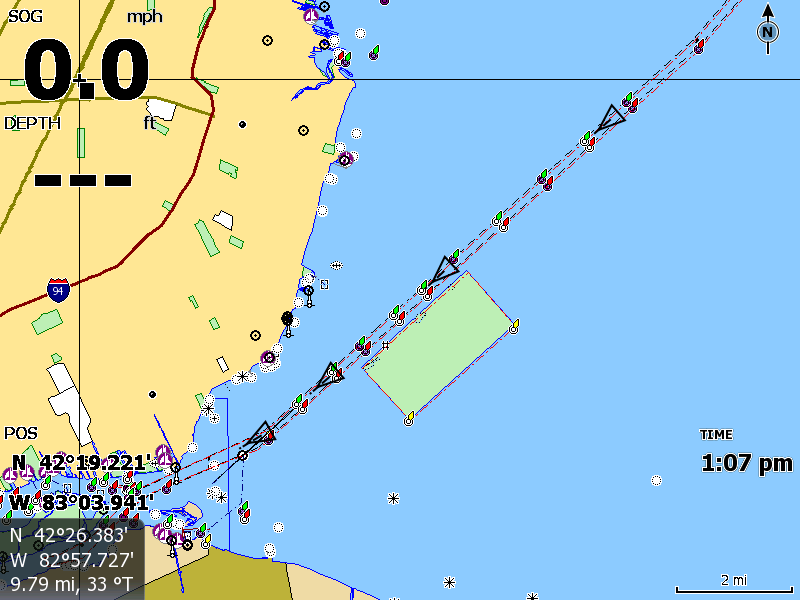
Recently I imported about a dozen sets of ROUTE data which were created by a fellow boater into my LOWRANCE HDS-8. (For details of the process see the separate thread on that topic.) After importing the ROUTE data, I was somewhat taken aback because my chart display was now showing all of the ROUTE information, which, in total, was hundreds of ROUTE POINTS. I did not want to see all the ROUTE data all the time. I found I could control the display of each ROUTE by the following procedure: In the HDS-8 operating system: --hit the PAGES button; --navigate to the WAYPOINTS, ROUTES, and TRAILS page; --hit ENTER; the WAYPOINT, ROUTES, and TRAILS window appears --move cursor to the ROUTES tab; a list of ROUTES appears --highlight a ROUTE; hit the softkey EDIT; the EDIT ROUTE window appears; --cursor (down) to DISPLAY field; --use ENTER key to toggle the blue DISPLAY icon ON or OFF; when BLUE the route will be displayed on the chart display; when blank the route will not be displayed on the chart display. --hit softkey SAVE to preserve changes; Using this method you can control the ROUTES displayed on an individual basis. |
| jimh |
posted 03-27-2011 10:26 AM ET (US)
Display of ROUTES on the chart is also controlled by a global setting which is adjusted as follows: --hit MENU twice; the SETTINGS menu appears: --cursor to CHART and hit ENTER or cursor right; --scroll to ROUTES; --toggle the blue icon ON (blue) or OFF (blank) to control global display of ROUTES on the chart. Note that when you toggle ROUTES to ON, only the routes which are set for display (see procedure above) will display. The global variable does not toggle on all routes again. |
| jimh |
posted 04-23-2011 02:40 PM ET (US)
Notes on the NMEA-2000 Networking The Lowrance HDS-8 is certified for connection to a NMEA-2000 network. My engine is also certified for connection to an NMEA-2000 network. My boat has a simple NMEA-2000 network, and I have connected both the engine and the HDS-8 to the network. This process seems to be prone to confusion, so I will explain in a bit greater detail. NMEA-2000 Network Backbone Wiring For my boat I am using a mixed network backbone wiring scheme. Most of my network uses the current NMEA-2000 recommended wiring for DeviceNET-Micro-C connectors. These connectors go by several names, depending on the manufacturer. Lowrance calls these connectors LowranceNET-RED. The generic name for them is DeviceNET Micro-C or DeviceNET Micro connectors. The wiring has three components: --network extension cables --network tees --network terminators All connections are arranged in Male-Female gender pairs, and this allows the network to be easily expanded. New devices can be inserted and will easily daisy-chain with the existing device. The most important aspect of NMEA-2000 networking is that there is no wiring to be done. The network wiring is assembled by simply joining all of the pre-assembled cables, tees, and terminators. There is no soldering, no wiring, no assembly of individual conductors to contacts in connectors. The only skill needed is to be able to properly distinguish between male and female genders, and to join them together without misalignment of the connectors, which are keyed. As long as the installer is not a Neanderthal, assembly is very simple and painless. The only exception to the above is the Network power cable. These cables are typically terminated in just loose conductors, one positive and one negative. These must be wired to a source of 12-Volt power. In my installation I use the switched 12-Volts from the engine IGNITION terminal as the source of network power (positive). The network negative lead goes to the 0-Volt bus (from the battery negative terminal). This wiring provides for the network to be powered ON whenever the ignition key switch is in the RUN or START position. My network backbone runs from the helm to the engine, a distance of only about 15-feet. The aft portion of the network is wired with LowranceNET-RED devices. The network at the helm area is a mixture of LowranceNET-RED and some older LowranceNET-BLUE wiring. This permits me to use some older Evinrude I-Command gauges which have the LowranceNET-Blue connectors attached to their integral cables. The transition between the RED and BLUE wiring is accomplished with short adaptor cables. These are also pre-made in RED-Male-to-BLUE-Female and RED-Female-to-BUE-Male pairs, permitting just about any combination of devices to be connected together. The backbone wiring is changed to LowranceNET-BLUE connectors, and there are several LowranceNET-BLUE Tees inserted at that point. The older gauges connect to those Tees. Then the network transitions back to the newer LowranceNET-RED wiring. The HDS-8 connects in this portion of the network backbone with an appropriate cable. If one is installing a new network and does not have any legacy devices that use different wiring, the network backbone wiring will be very simple and will use all LowranceNET-RED devices. The easiest way to build a small network is by buying the Lowrance Network Starter Kit. This $50 kit will give you all the wiring devices you need to create a simple network, ready to attach your first device. LOWRANCE PARTS, PART NUMBERS, PRICES, DESCRIPTIONS follow: Starter Kit--Part # 124-69--$49.95 The starter kit is a bargain. Its price is much less than the sum of the prices for its components. You can order it from Lowrance's on-line sales website:
|
| jimh |
posted 04-24-2011 09:23 AM ET (US)
NMEA-2000 devices are connected to the network backbone wiring by use of tee-connectors and network extension cables. When a network extention cable is used to connect a device to a network tee it is called a drop cable. Some NMEA-2000 devices have integral drop cables attached to them which terminate in a connector. These devices can be connected directly to a network-tee, or, if a longer drop cable is needed, can be connected by using a network extension cable. Devices without integral cables will have a network connector, and these devices are connected to the network-tee using a network extension cable for the drop cable. The Lowrance HDS-8 has a network connector which is compatible with the LowranceNET-RED system, and it connects to the backbone with a LowranceNET-RED network extension cable. Engine manufacturers seem to eschew use of the standardized connectors, and they often use an unusual connector. That is the case with the Evinrude E-TEC. The NMEA-2000 connector on the E-TEC is a four pole Amp SealTite connector. A specialized drop cable is needed to connect the engine to the network backbone. Fortunately, Lowrance makes such a specialized drop cable: Evinrude Engine Interface Cable--Red--Part # 120-62--$69.00 |
| jimh |
posted 01-02-2012 09:15 AM ET (US)
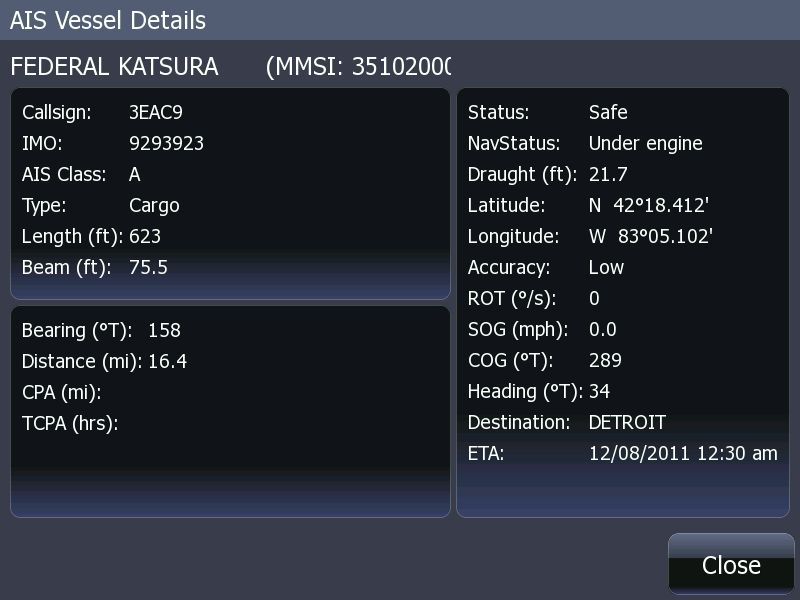
Recently I purchased an AIS receiver and interfaced it to the HDS-8 using the NMEA-0183 serial port. Most all AIS receivers are configured to transmit data on their NMEA-0183 serial port at 38,400-BPS, a higher speed than the standard setting. The HDS-8 must be configured to have its NMEA-0183 serial port speed set to 38,400-BPS. With the AIS receiver connected, AIS ship targets were displayed on the CHART of the HDS-8. Ships display as generic triangle icons with a small line extending forward that indicates their heading. I believe the line length will be proportional to speed, but all my targets were moving at about the same speed so their line extensions were all the same length. Here are two typical screen captures:
You can see more details about the interface of the HDS-8 to the AIS receiver in a REFERENCE article about AIS Ship Spotting: http://continuouswave.com/whaler/reference/AIS_ShipSpotter.html The HDS can also display an information screen about each target. |
| davej14 |
posted 01-02-2012 10:01 AM ET (US)
Can the opacity of the soft keys be adjusted so that they do not obscure chart data? |
| jimh |
posted 01-02-2012 12:29 PM ET (US)
The opacity of the on-screen soft key legends cannot be adjusted. They do not obscure chart data. The keys disappear off the screen after a few seconds. They reappear when a button is pushed to bring them back. This feature was added in one of the more recent software patch upgrades. It was a good addition to the feature set. |
| jimh |
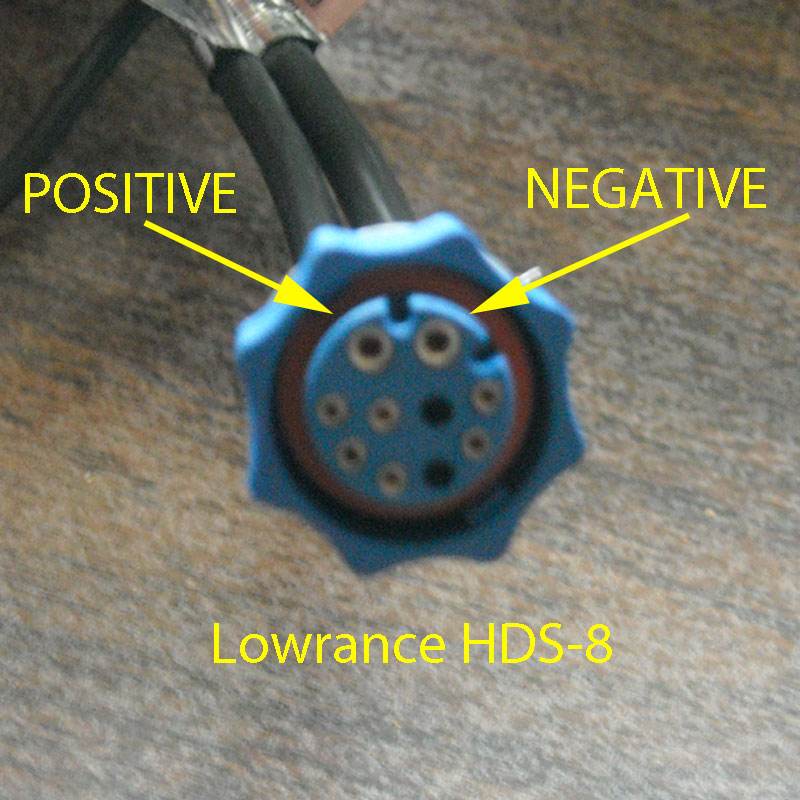
posted 01-02-2012 12:34 PM ET (US)
The image below shows the orientation of the circuits in the HDS POWER/DATA connector. The power is provided on the two large contacts. The polarity is shown in the callouts:
|
| Tool958 |
posted 02-13-2012 09:10 AM ET (US)
Jim, I appreciate the work you've put in posting about the HDS-8. I originally picked up on the post off of the E-TEC owners forum and have been following the thread since. I am trying to set it up so I can use my HDS-8 in the house. I bought an extra gimbal bracket and a power/data cord. For some reason it won't power up for me. It will light like it is trying to start up, but won't go on from there. I am using a 12V adapter. I checked the plug and it is showing 12.5V. Is there any of the other wires besides the positive and negative leads that have to be used in order for it to work? |
| jimh |
posted 02-13-2012 01:13 PM ET (US)
The HDS-8 should power up with just the RED and BLACK wires of the power cable connected. On my bench I run my HDS-8 from a storage battery. Perhaps the power adapter you are using has something unusual. It could have: --DC voltage too high, or too low I suggest trying to operate from a 12-Volt battery as a test. That will eliminate your power adapter from the circuit. If your HDS-8 does not power ON from a battery, something is awry. |
| z281974 |
posted 02-13-2012 01:21 PM ET (US)
If you're using a power brick it probably can't supply enough current to power your [HDS-8]. These [HDS-8's] can easily draw over 1-Ampere, continuous. Check the rating of the power source; it should be at least 2,00-mA to be work. |
| Tool958 |
posted 02-13-2012 07:43 PM ET (US)
Thank you both for your replies. I will try [changing the power source to] a battery. More than likely [the HDS-8] isn't getting enough Amperes. I hadn't even thought of that; when I checked, I only checked for voltage, not Amperes. I will let you know the outcome. |
| DVollrath |
posted 02-13-2012 09:53 PM ET (US)
From the HDS-8/10 manual: Supply current: You could be right on the edge with a 500mA power converter, as was stated before. |
Powered by: Ultimate Bulletin Board, Freeware Version 2000
Purchase our Licensed Version- which adds many more features!
© Infopop Corporation (formerly Madrona Park, Inc.), 1998 - 2000.